Estimation User Guide
Managing Your Estimations
Manage Existing Estimations
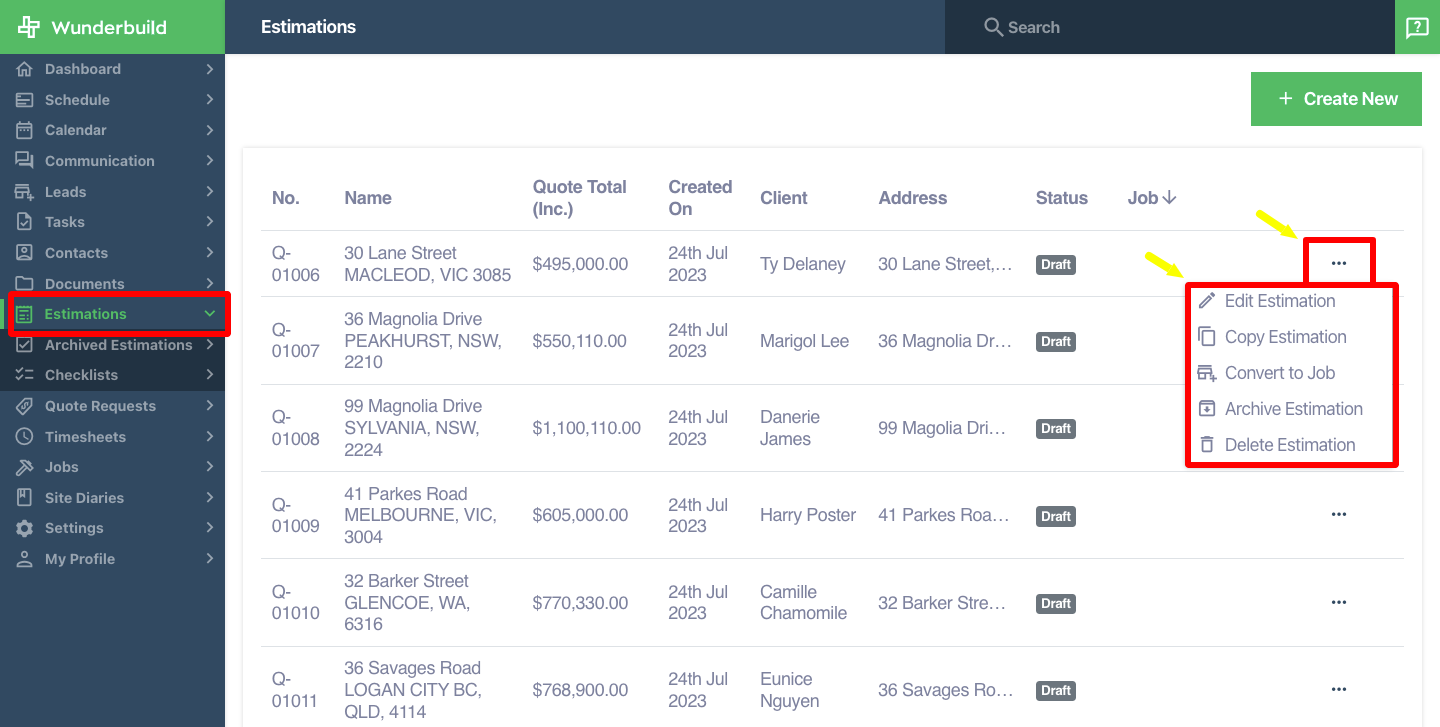
1. Accessing the Estimation Management Tab: Navigate to the Estimation Management tab on the main menu to view the visual board of all the estimations.
2. Modify an Estimation:
- Click the three dots beside the Estimation to edit, copy, convert, archive, or delete it.
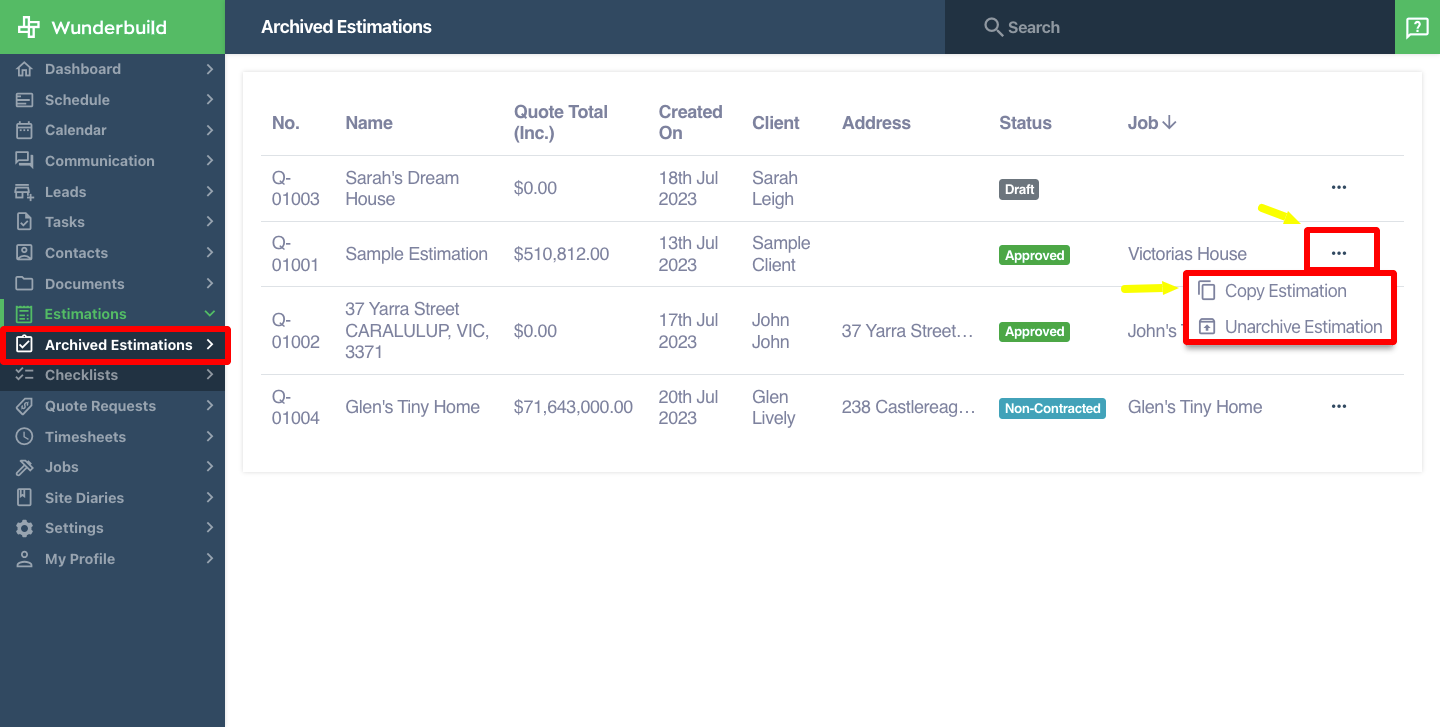
3. Accessing the Archive Estimation Management Tab: Navigate to the Archived Estimation Management tab on the Estimation menu to view the visual board of all the archived estimations.
4. Modify and Archived Estimation:
- Click the three dots beside the Archived Estimation to copy or unarchive it.
Create and Manage Estimation Checklists
5. Accessing the Estimation Checklist Management Tab: Navigate to the Estimation Checklist Management tab on the Estimation menu to view the visual board of the aggregated checklist for all estimations.
6. Filtering the Estimation Checklist:
- Click on “Filters” or utilise the dedicated search bar.
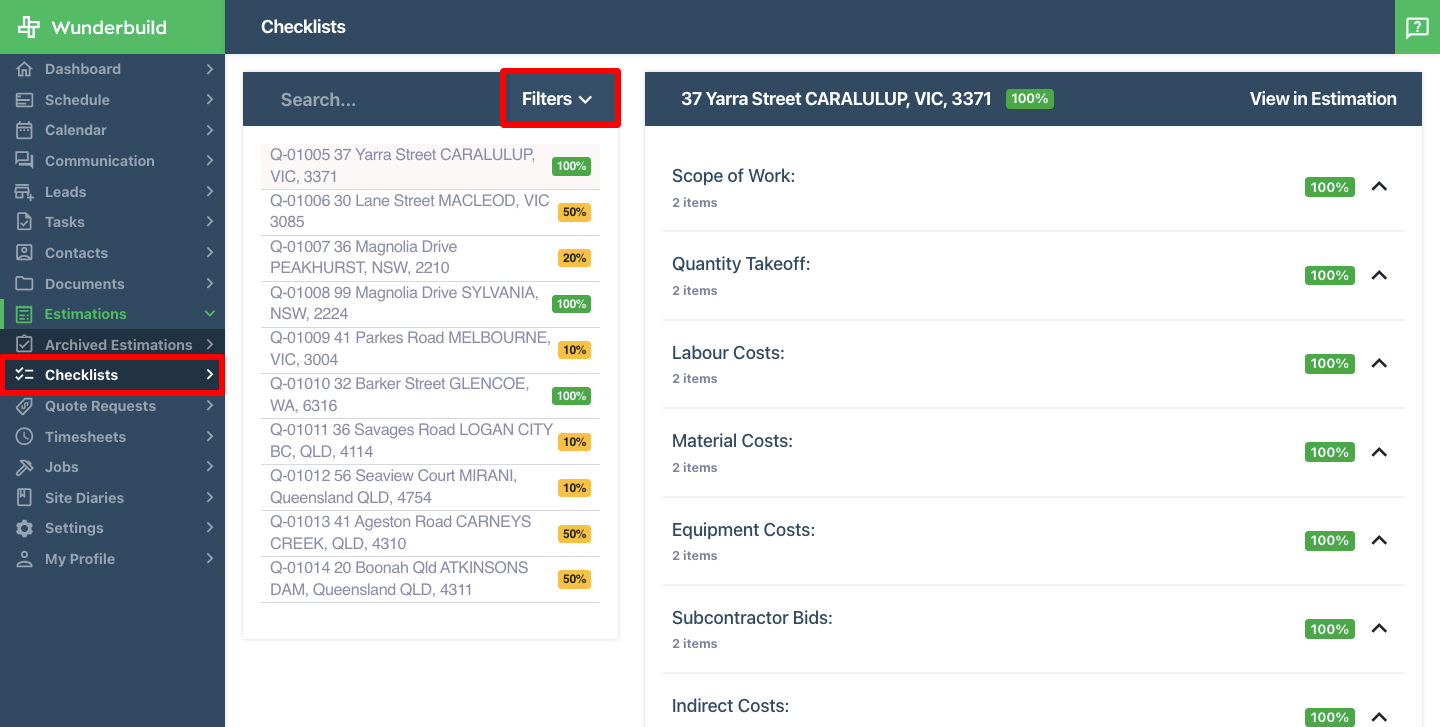
7. Editing the Estimation Checklists:
- Select the specific Estimation Checklist.
- Tick or untick the checkboxes as needed to adjust the progress.
- Click "View in Estimation" to access its Estimation Overview.

Create a New Estimation
8. Creating a new Estimation.
- On the Estimation Tab. Click on “Create New”.
- Fill up the necessary information.
- Click “Create”.


Estimation Overview
9. Accessing the Estimation Overview Tab: Navigate to the Estimation Overview tab by
clicking on an existing Estimation or creating a new estimation.
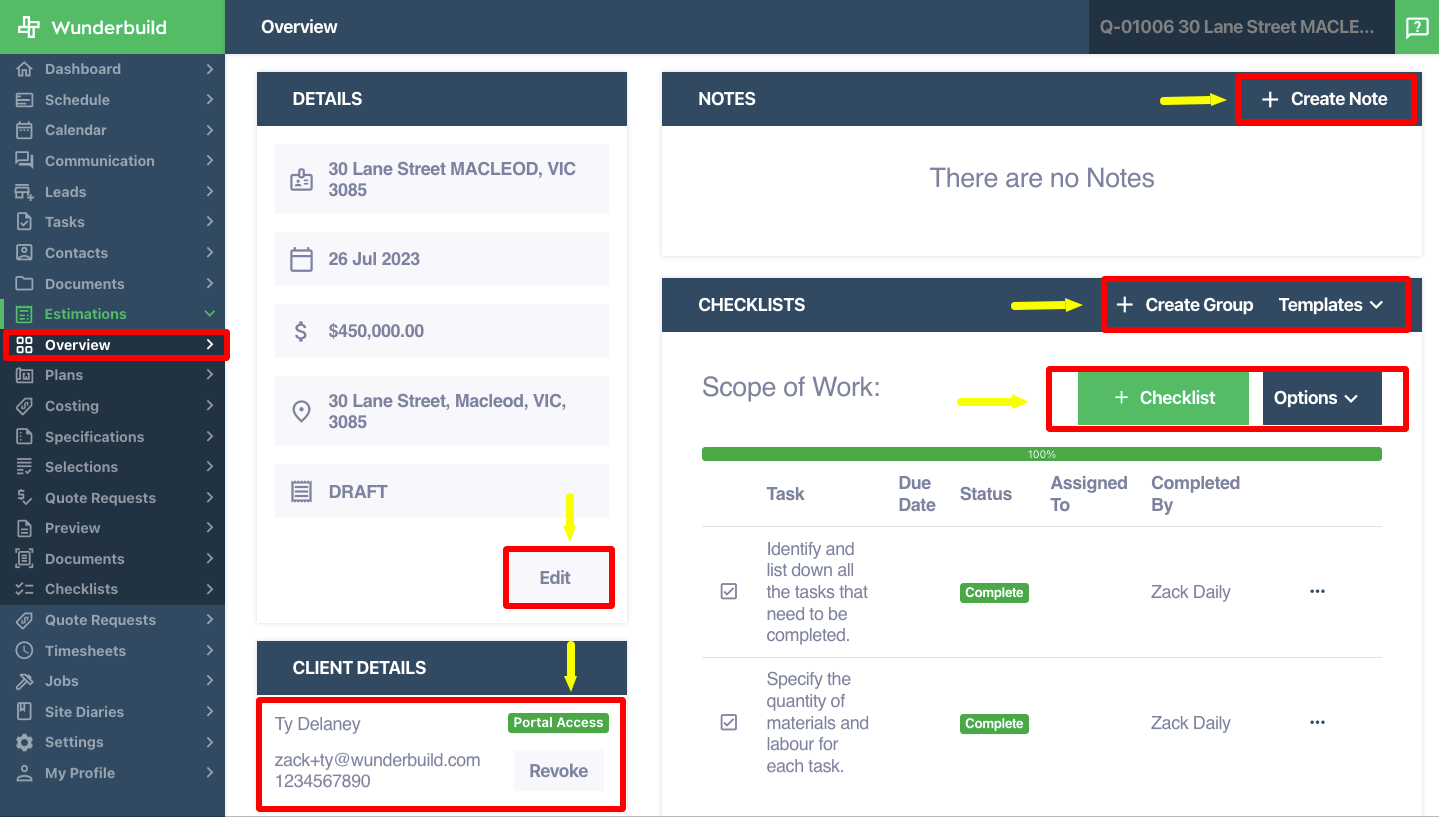
10. Navigating the Estimation Overview page:
a) Editing the Estimation details:
- Click "Edit" under the details to modify any information.
- Click “Update” after modifying.
b) Managing Clients:
- Invite the client through the web or app.You may also revoke client’s access in this section.
c) Adding Notes to Estimation:
- Click “Create Note” to add notes to the estimation.
d) Checklists
- Save or import your checklist template by clicking “Templates”.
- Create your Estimation Checklists by clicking on “Create Group”.
- Add your Checklist to your current group by clicking “+ Checklist”.
- Edit or delete the checklist by clicking “Options”.
- Edit or delete the tasks by clicking on the three dots beside the checklist task.
Upload Plans
11. Accessing the Estimation Plans Tab: Navigate to the Estimation Plans tab by clicking on the Plans subtab.
12. Uploading your plans:
- Simply drag and drop the file to the dedicated section for your file.
- Select pages to simplify which are needed for the scaling and take-off section.
- Click on “Next” to proceed.

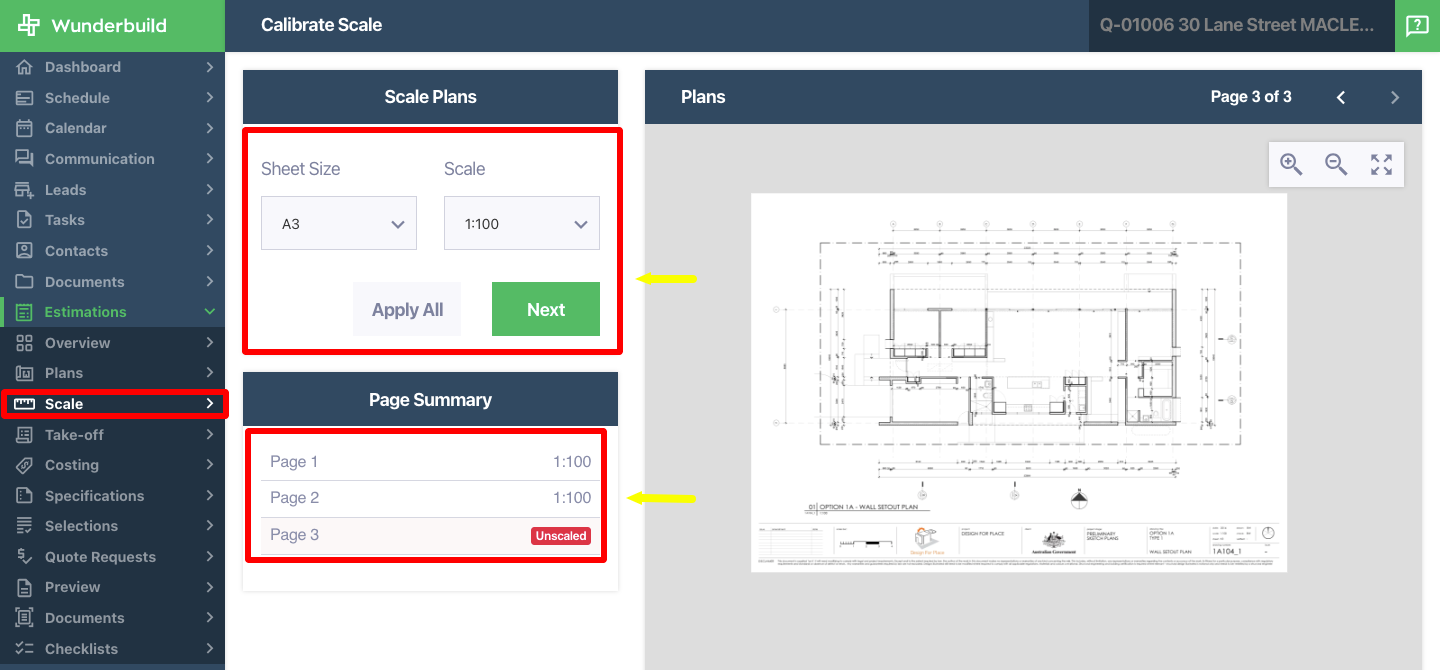
Scale Plans
13. Accessing the Estimation Scale Tab: Navigate to the Estimation Scale tab by clicking on the Scale subtab.
14. Scale your plans:
- Scale the pages based on the measurement of each blueprint if available.
- If measurements are not available use the custom scale by clicking on the dropdown button for sheet size and selecting “Custom”.
- Use the custom scale by clicking point to point and adding the measurement.
- Click “Next” to apply the measurement.
- Make sure to scale all your pages before proceeding to take-offs.

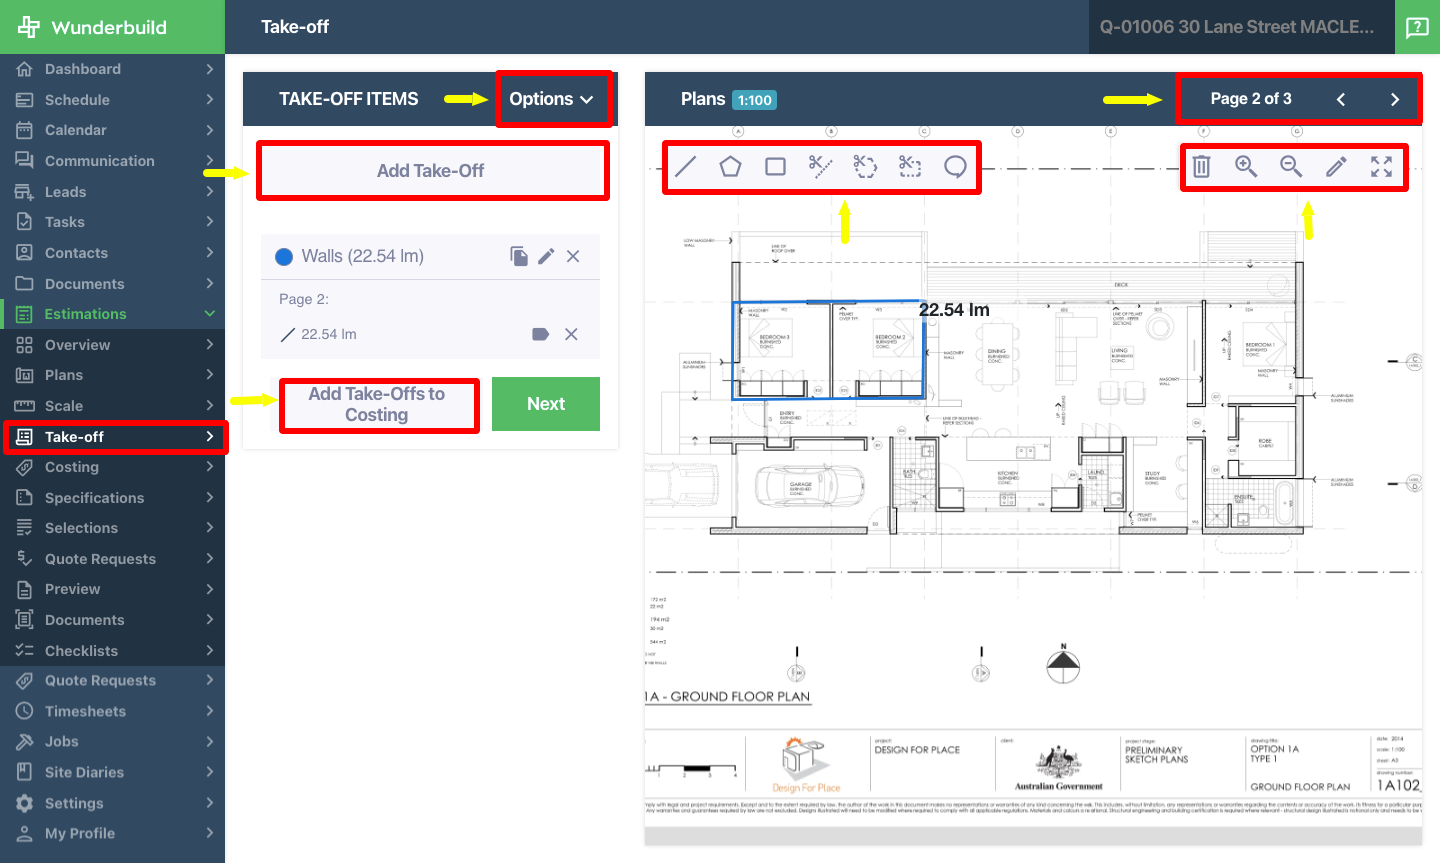
How to do Take-offs
15. Accessing the Estimation Take-off Tab: Navigate to the Estimation Scale tab by clicking on the Take-off subtab.
16. Take-offs
- Download, save, or import a template using the options drop down menu.
- Add a take off item by clicking on “Add Take-off”.
- “Add Take-Offs to Costing” will add your current take-off items to your costing section.
- Change which page you are doing take-offs by clicking the arrows in the Page section.
- Use the different tools provided like line, polygon, rectangle to do your take-offs.
- Delete, zoom in, zoom out, draw line or maximise and minimise using the tools on the top right corner.
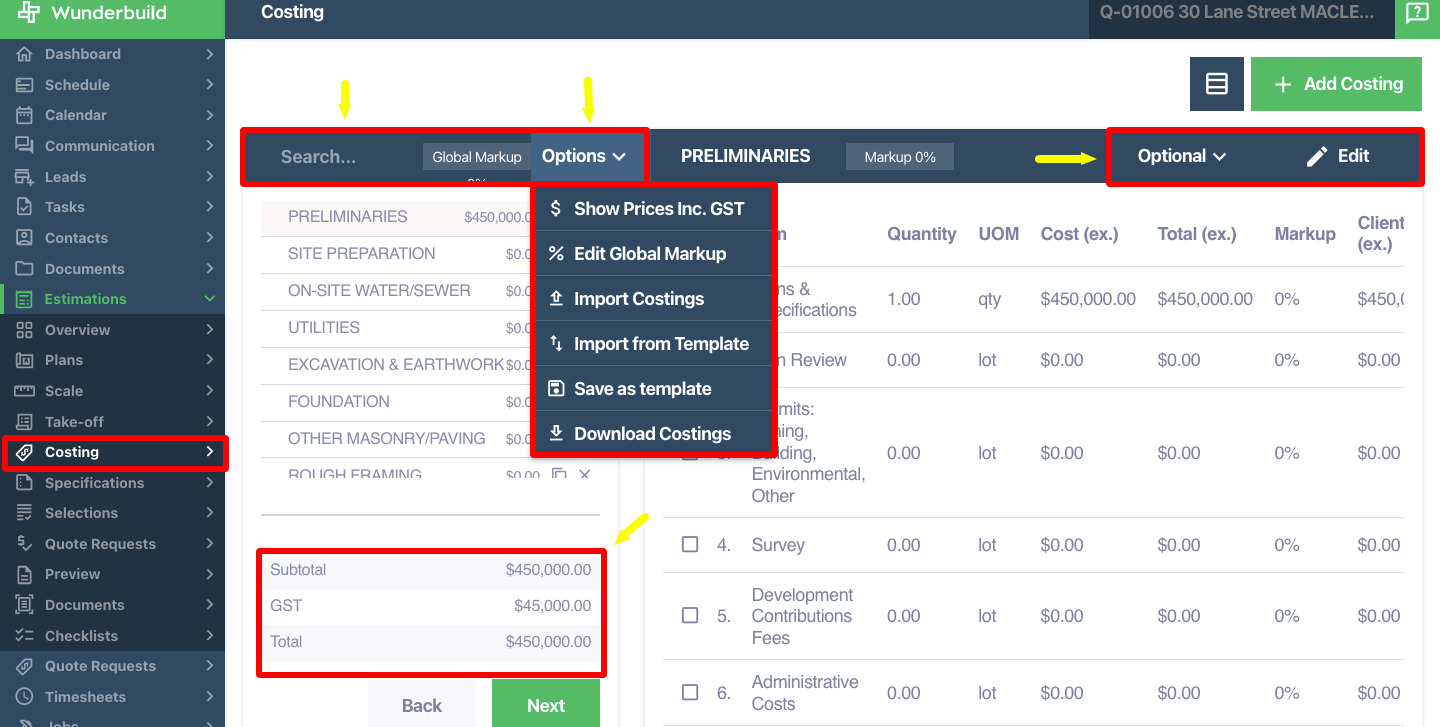
Manage Estimations Costings
17. Accessing the Estimation Costing Tab: Navigate to the Estimation Costing tab by clicking on the Costing subtab.
18. Navigating the Costing Tab:
- Switch views to categories overall cost by clicking the icon beside the “+ Add Costing”.
19. Add a new costing:
- Click on “+ Add Costing”.
- Create a Category and add your markup.
- Toggle Costing Items such as notes and GST related items.
- Add your Items, Quantity, Unit of Measurement, Costs, and Markup (optional).
- Click “Update” to save.
20. Price Lookup:
- You may look up certain items’ prices once you have added a Price List in your account.
- Items in the price list will auto-populate their costs.


21. Category Search Bar: Search a certain category.
22. Costing options:
- Click the dropdown button on Options to edit costing options.
- Show prices including or excluding GST.
- Edit your Global Markup.
- Import costings from Spreadsheet.
- Import costings from Template.
- Save current costing as a Template.
- Download Costings to a Spreadsheet file.
23. Filter Costings:
- Filter current items by clicking the Optional drop down button. Filter by Completed, Incomplete, Optional, and Not used.
24. Edit Costings:
- Edit current items by clicking the “Edit” button.
25. Costing Item Changes
- Checkbox - Tick off items that you need to make changes.
26. Copy a costing item
- Tick off items you would like to copy click “Copy to”.
- Select the appropriate Costing category.
27. Add item/s to Selection.
- Select item/s to include in Selection.
- Click on “Add to Selection”
- Proceed to Estimations Selection subtab.
28. Add item/s to Specification.
- Select item/s to include in Specification.
- Click on “Add to Specification”
- Proceed to Estimations Specification subtab.
29. Add item/s to Allowance.
- Select item/s to include in Allowance.
- Click on “Allowance” to tag the item as an allowance.
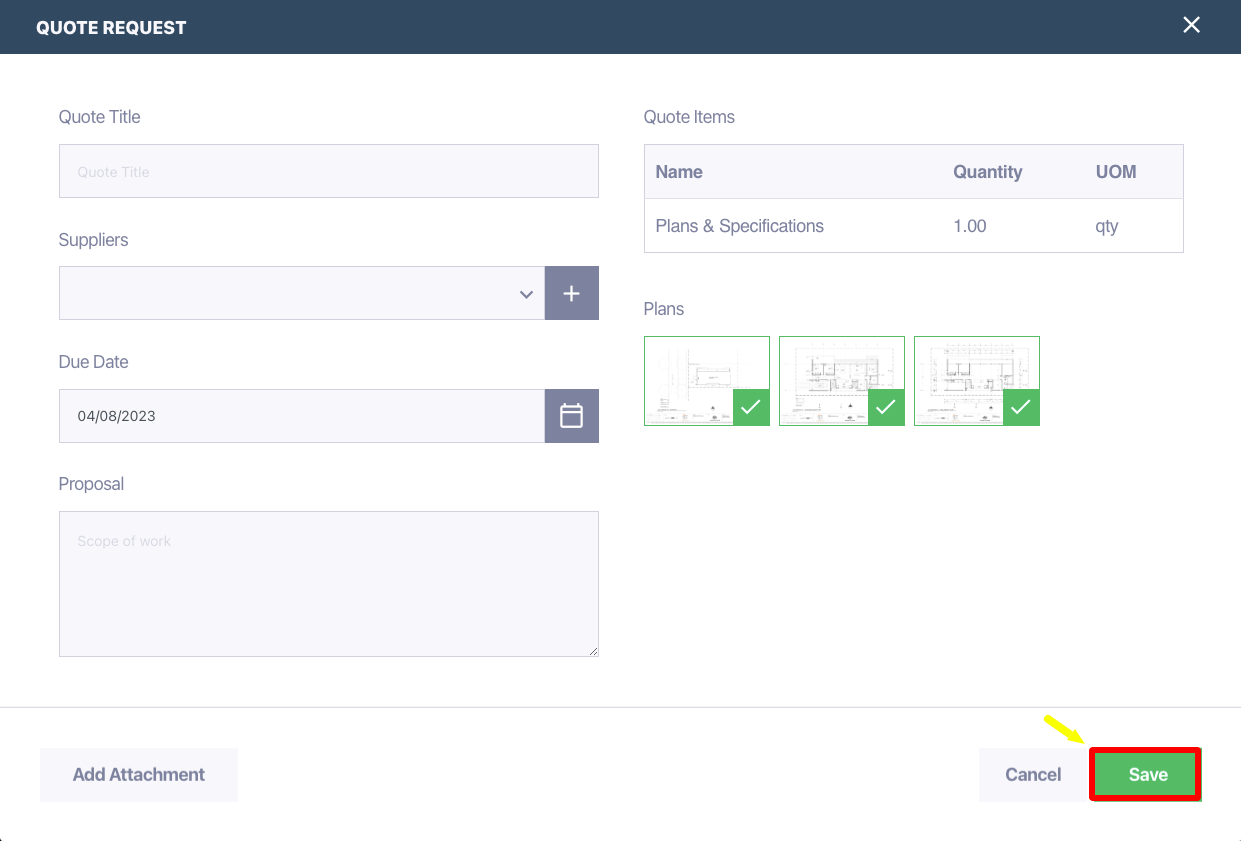
30. Create Quote requests:
- Select item/s you would like to request for a Quote.
- Click on “Quote Items”.
- Fill in the fields, add attachments or share the plans.
- Click on “Save”.
- Construct an email to Supplier.
- Proceed to Quote Request subtab.

Create Specifications
31. Accessing the Estimation Specifications Tab: Navigate to the Estimation Specifications tab by clicking on Specifications under the Estimation Tab
32. Navigating the Specification tab.
- Save current specification as a template, import items from costing or template by clicking on the dropdown button on “Options”.
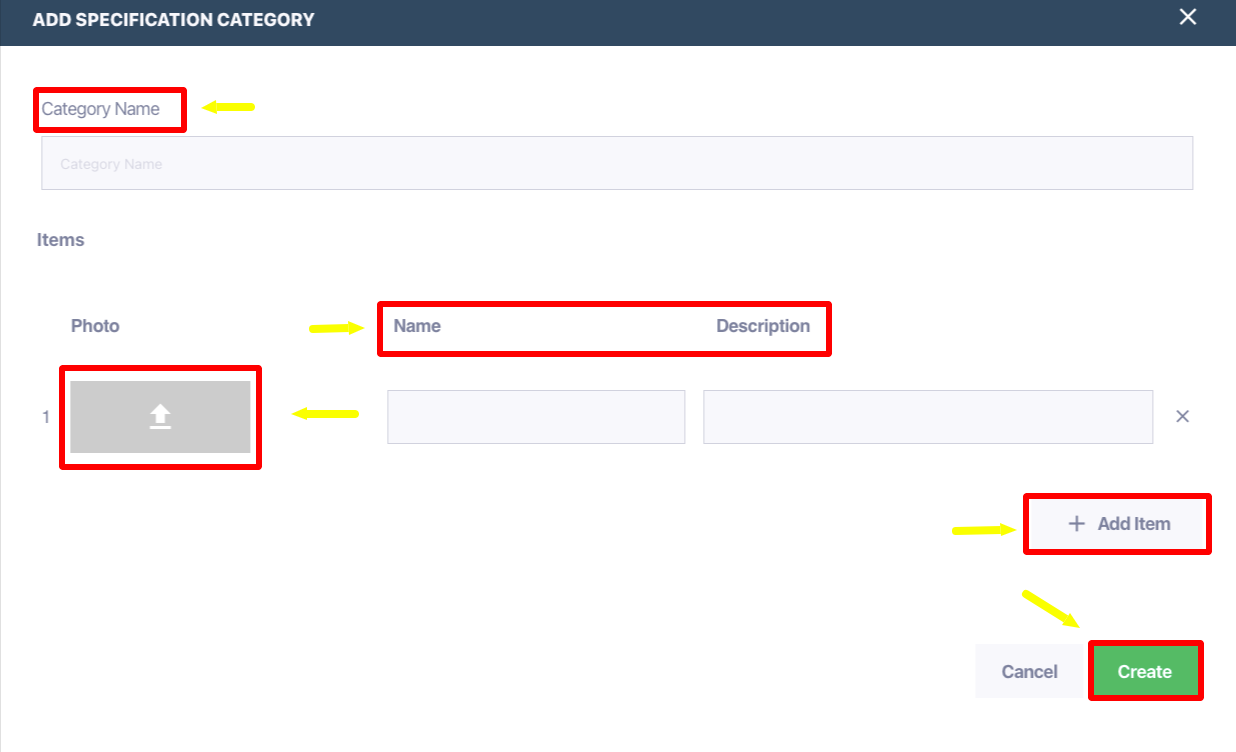
33. Add a new Category:
- Click on “Add Category”.
- Fill up the necessary fields.
- Click on “Create”.
34. Editing Items in a category.
Click on “Edit”.
Edit necessary fields.
Click on “Update”.

Create Selections
35. Accessing the Estimation Selections Tab: Navigate to the Estimation Selections tab by clicking on Selections under the Estimation Tab
36. Navigating the Selections tab.
- Click on the dropdown button beside “Options” to share the selections to the client. You may also save the current selections as a template or import another template.
37. Add a new Category:
- Click on “Add Category”.
- Fill up the necessary fields.
- Click on “Create”.
38. Editing categories:
- Click on “Edit”.
- Edit necessary fields.
- Click on “Update”.
39. Creating items in a category:
- Click on “Create Items”.
- Edit necessary fields.
- Click on “Create”.
40. Editing Items in a category:.
- Click on “Options” beside “+Create Options”.
- Click on “Edit” or “Delete”
- Edit necessary fields after choosing “Edit”
- Click on “Update”
41. Creating Options in an Item.
- Click on “Create Options”.
- Edit necessary fields.
- Click on “Create”.
42. Editing Options in an Item:
a) Manually selecting an Option.
- Click on “Options” beside the item you want to select.
- Click on “Select”.
b) Editing an Option.
- Click on “Options” beside the item you want to edit.
- Click on “Edit”.
- Edit necessary fields.
- Click on “Update”.
c) Deleting an Option.
- Click on “Options” beside the item you want to delete.
- Click on “Delete”.

Manage Estimation Quote Requests
43. Accessing the Estimation Quote Request Tab: Navigate to the Estimation Quote
Request tab by clicking on Quote Request under the Estimation Tab
44. Navigating the Quote Request subtab.
a) Click the Quote Request to navigate between each Quote Request.
b) Editing the Quote Request.
- Click on the Options button to either print, send, or manually fulfil the Quote Request.
- Click Print Request to print your Quote request.
- Click Send your request to the supplier.
- Click on Manual Entry to manually enter the cost given by the supplier.
c) Create a note on a Quote Request.
- Click on “Create Note” to create a note on a Quote request.
d) You will see the supplier’s replies on the Comments section. You may choose
to reply to the supplier by entering your message and clicking on the Send icon.

Preparing Quote Proposal
45. Accessing the Estimation Preview Tab: Navigate to the Estimation Preview tab by
clicking on Preview under the Estimation Tab.
46. Navigating the Preview Tab: Zoom in, zoom out or maximise using the dedicated
icons.

47. Click Print to print the preview.
48. Click Send to send the preview to the client.
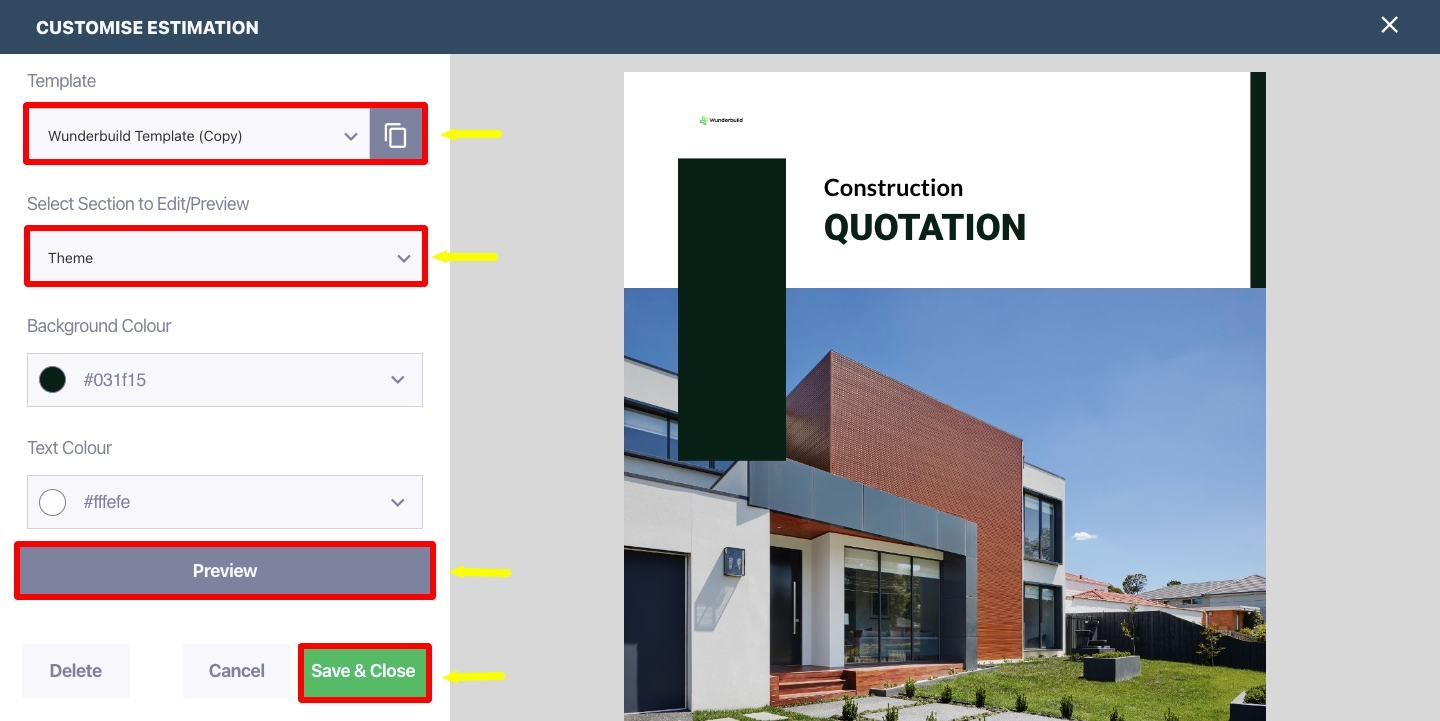
49. Click on Customise to customise the preview:
a) Choose your template. Either use Wunderbuild template or customise and
save your own template to match with your branding.
b) Theme: Choose your branding colours.
c) Cover: Customise your cover with cover title, feature images, your brand logo
and more. You may disable this page by toggling the “Enable Cover” button.
d) Footer: Customise the footer text. Toggle the “Text” button to have the text
specific only to this customer. You may disable this page by toggling the “Enable Footer” button.
e) Letter: Customise the letter text. Toggle the “Text” button to have the text
specific only to this customer. You may disable this page by toggling the “Enable Letter” button.
f) Costing: Toggle “Display options” button to enable or disable some costing
items. You may disable this page by toggling the “Enable Costing” button.
g) Allowances: “Display options” button to enable or disable some allowance
items. You may disable this page by toggling the “Enable Allowances” button.
h) Specifications: Customise the summary text. You may disable this page by
toggling the “Enable Specifications” button.
i) Notes: You may disable this page by toggling the “Enable Notes” button.
j) Summary: Customise the summary text. “Display options” button to enable or
disable some allowance items. You may disable this page by toggling the “Enable Summary” button.
k) Terms and Conditions: Customise the terms and conditions text. You may
disable this page by toggling the “Enable Terms” button.
l) Quote Acceptance: Customise the quote acceptance text. You may disable
this page by toggling the “Enable Acceptance” button.
50. Convert to Job: Once the client accepts the Terms and Conditions and you are ready to proceed with the job, you may convert the estimation to a job.
Manage Estimations Documents
51. Accessing the Estimation Documents Tab: Navigate to the Estimation Documents tab by clicking on Documents under the Estimation Tab.
52. Navigating the Documents Tab: Navigate through each folder by clicking the folders or go back to the root folder by clicking the estimation title ie. Estimation#x.
53. Delete folder/s or file/s. Tick necessary checkboxes and click on Delete selected.
54. Copy folder/s or file/s. Tick necessary checkboxes and click on Copy selected.
55. Create a new folder: Click on “New Folder” and enter the desired name.
56. Upload files to a folder by clicking “Upload files”.
57. To edit the current folder click on “Edit”.
58. To edit a file or a folder click on the three dots beside the file/folder.
a) Delete the file/folder.
b) Edit the file/folder name.
c) Copy the file or folder.
d) Share the folder with the client.

Related Articles
Wunderbuild App Estimation User Guide
1. Accessing the Estimations : Navigate to Estimations by clicking on the four boxes icon on the bottom right of your screen. Select Estimations. 2. Estimation Overview: Click on the estimation name to navigate to the Estimation overview section. 3. ...Wunderbuild Job Schedule 2.0 User Guide
Importing The following is a guide on the updated Wunderbuild job schedule. To begin go to your jobs then schedule section inside your job. 1. Click ‘options’ on your schedule to import your schedule into Wunderbuild. Below are instructions on the ...App Documents User Guide
1. Accessing the Overall Documents : Navigate to Documents by clicking on the four boxes icon on the bottom right of your screen. Select Documents. 2. Navigate to your desired estimation or job’s document by clicking the desired folder. You may ...Dashboard User Guide
1. Accessing the Dashboard: Navigate to the Dashboard tab on the main menu to view the dashboard. 2. Understanding the dashboard. There are four section in the dashboard: a) Estimation In Progress - Quick links to quickly navigate through your ...Quote Requests User Guide
1. Accessing the Quote Request Tab: Navigate to the Quote Request tab by clicking on Quote Request in the main menu to view all of your Quote Requests in Wunderbuild. 2. Viewing Quote Requests: Click on the dropdown button beside the job’s name to ...