Job Management User Guide
Managing All Existing Jobs
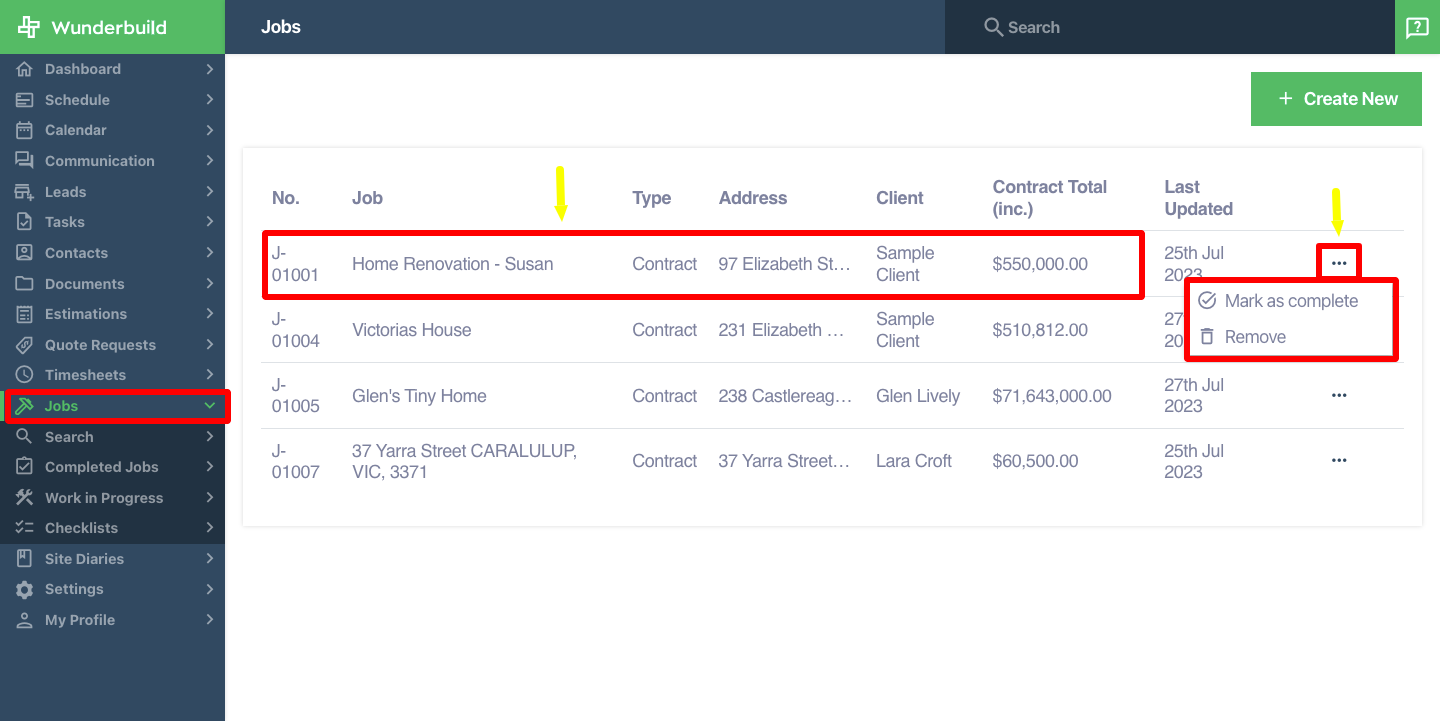
1. Accessing the Jobs Management Tab: Navigate to the Jobs Management tab on the main menu to
view the visual board of all the jobs.
2. Accessing and modifying a Job:
- Click the job title to access that specific job.
- Click the three dots beside the Job to mark it as complete or remove it. If the job was an estimation prior to conversion it will revert back to an estimation.
Searching Jobs
3. Accessing the Jobs Search Tab: Navigate to the Jobs search tab on the Jobs menu by clicking on
the Search subtab.
4. Navigating the Jobs Search subtab: Jobs search subtab includes all of your invoices from the jobs
bar.
a) Filter by the invoice type:
- Choose invoice subtype such as Purchase orders, Progress clams, variations, or rosters.
b) Filter by the invoice status:
- Choose invoice status such as draft, sent, received, or partially received.
c) Search by keyword:
- Type in a keyword for a specific invoice and enter.
d) Choose an invoice:
- Click on a specific invoice to view its details.
e) Go to an invoice specific job:
- Click on the “View on Job” button while you are on a specific invoice.

View Completed Jobs
5. Accessing the Completed Jobs subtab: Navigate to the completed jobs subtab on the Jobs menu
to view the visual board of the aggregated list of all completed jobs.
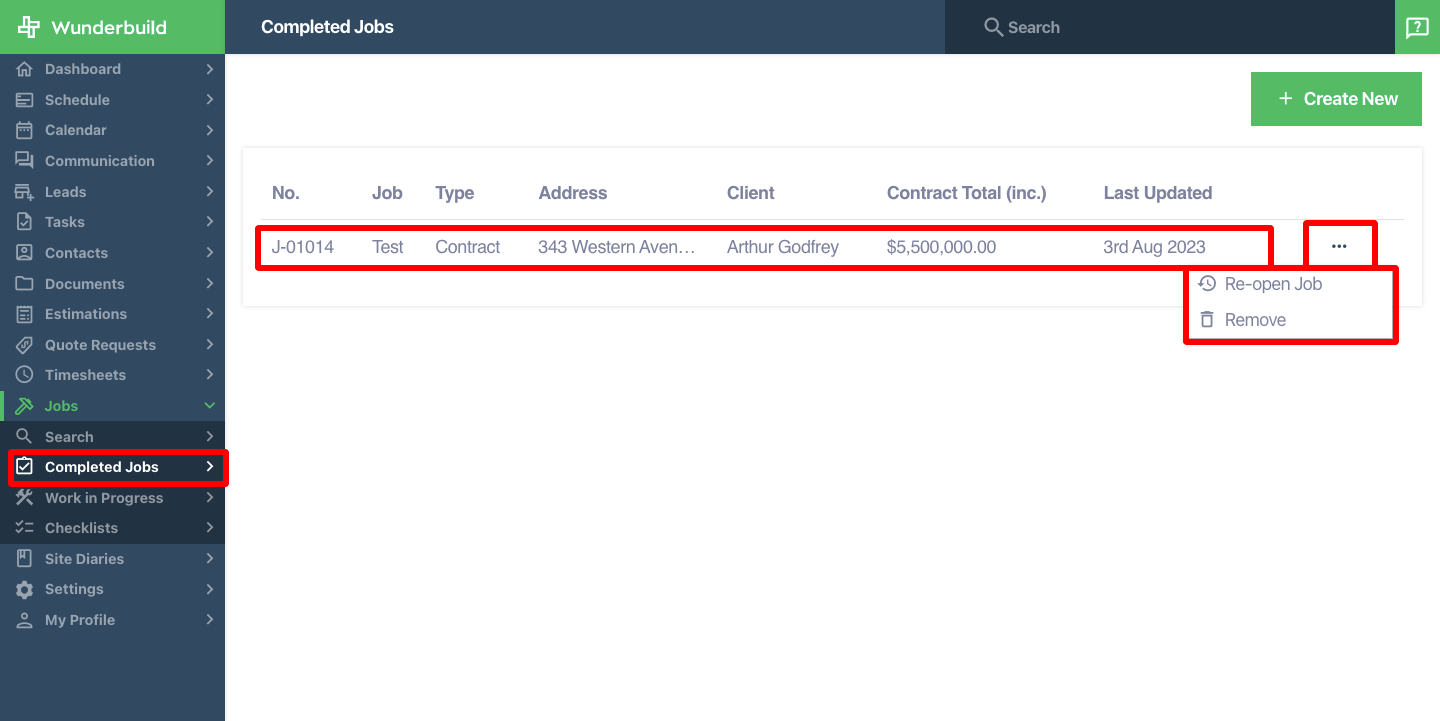
6. Navigating the Completed Jobs subtab:
a) Checking the completed job details:
- Click on the specific completed job to access it.
b) Modifying a completed job:
- Click on the three dots to either re-open the job or remove it completely from the system.
Work In Progress Across All Jobs
7. Accessing the Work in progress subtab: Navigate to the work in progress subtab on the Jobs menu
to view the visual board of the aggregated list of all jobs that are work in progress.
8. Exporting the WIP data: Simply click on the down button to export the WIP data.

View All Job Checklists
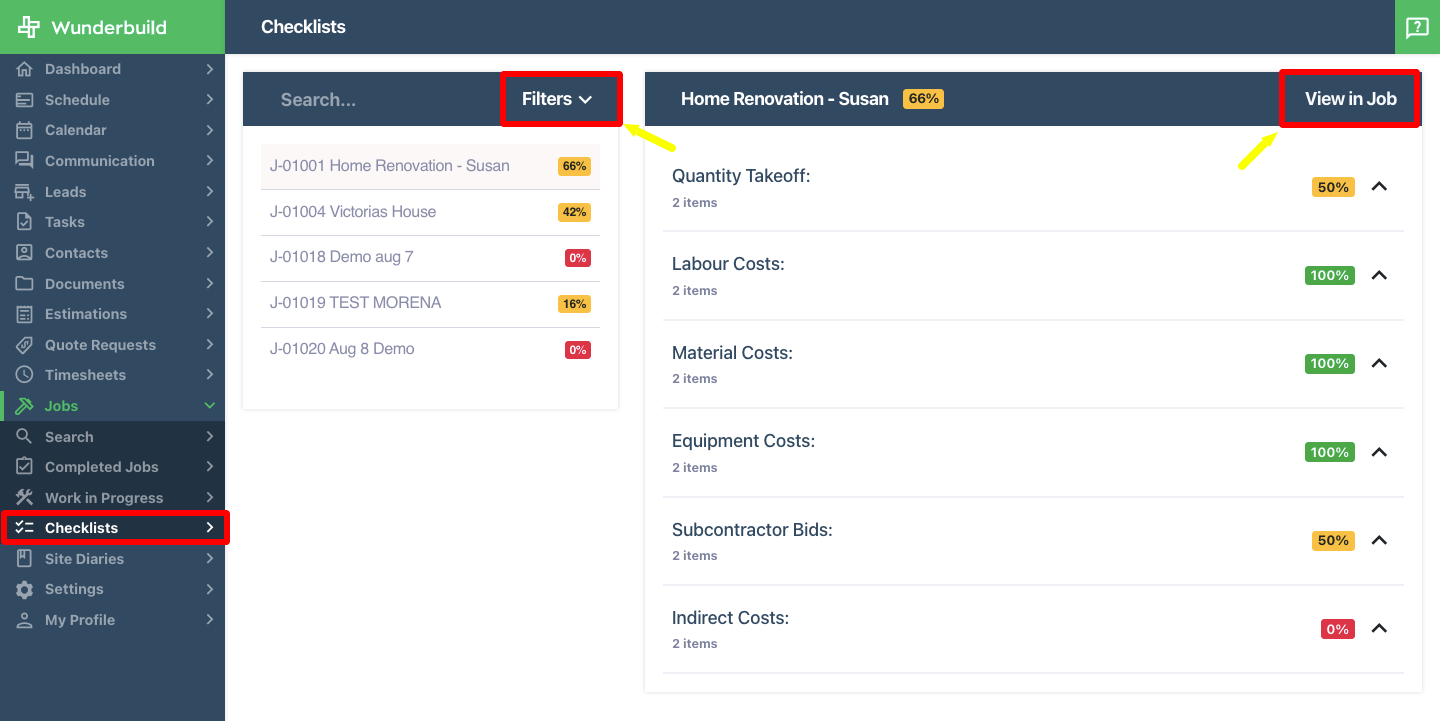
9. Accessing the Jobs Checklist Management Tab: Navigate to the Jobs Checklist Management tab on
the Jobs menu to view the visual board of the aggregated checklist for all jobs.
10. Filtering the Job Checklist:
- Click on “Filters” or utilise the dedicated search bar.
11. Editing the Job Checklists:
- Select the specific Estimation Checklist.
- Tick or untick the checkboxes as needed to adjust the progress.
- Click "View in Job" to access its Estimation Overview.
Create And Manage All Jobs
Create A New Job
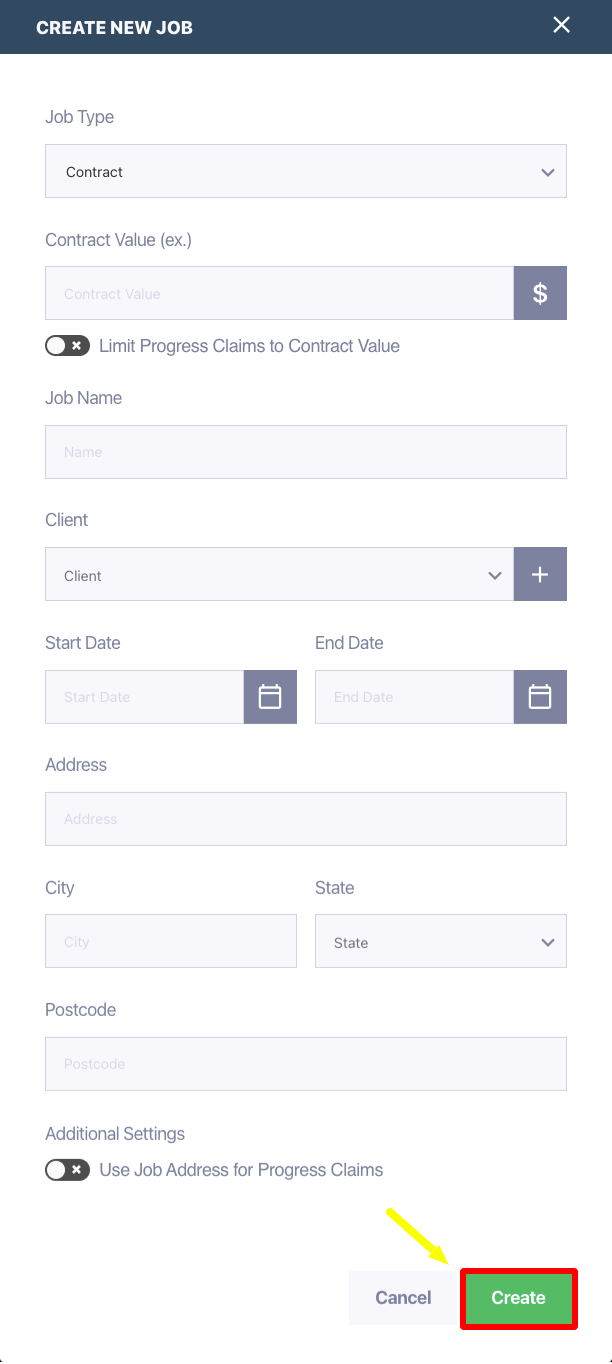
12. Creating a new Job.
- On the Estimation Tab. Click on “Create New”.
- Fill up the necessary information.
- Click “Create”.

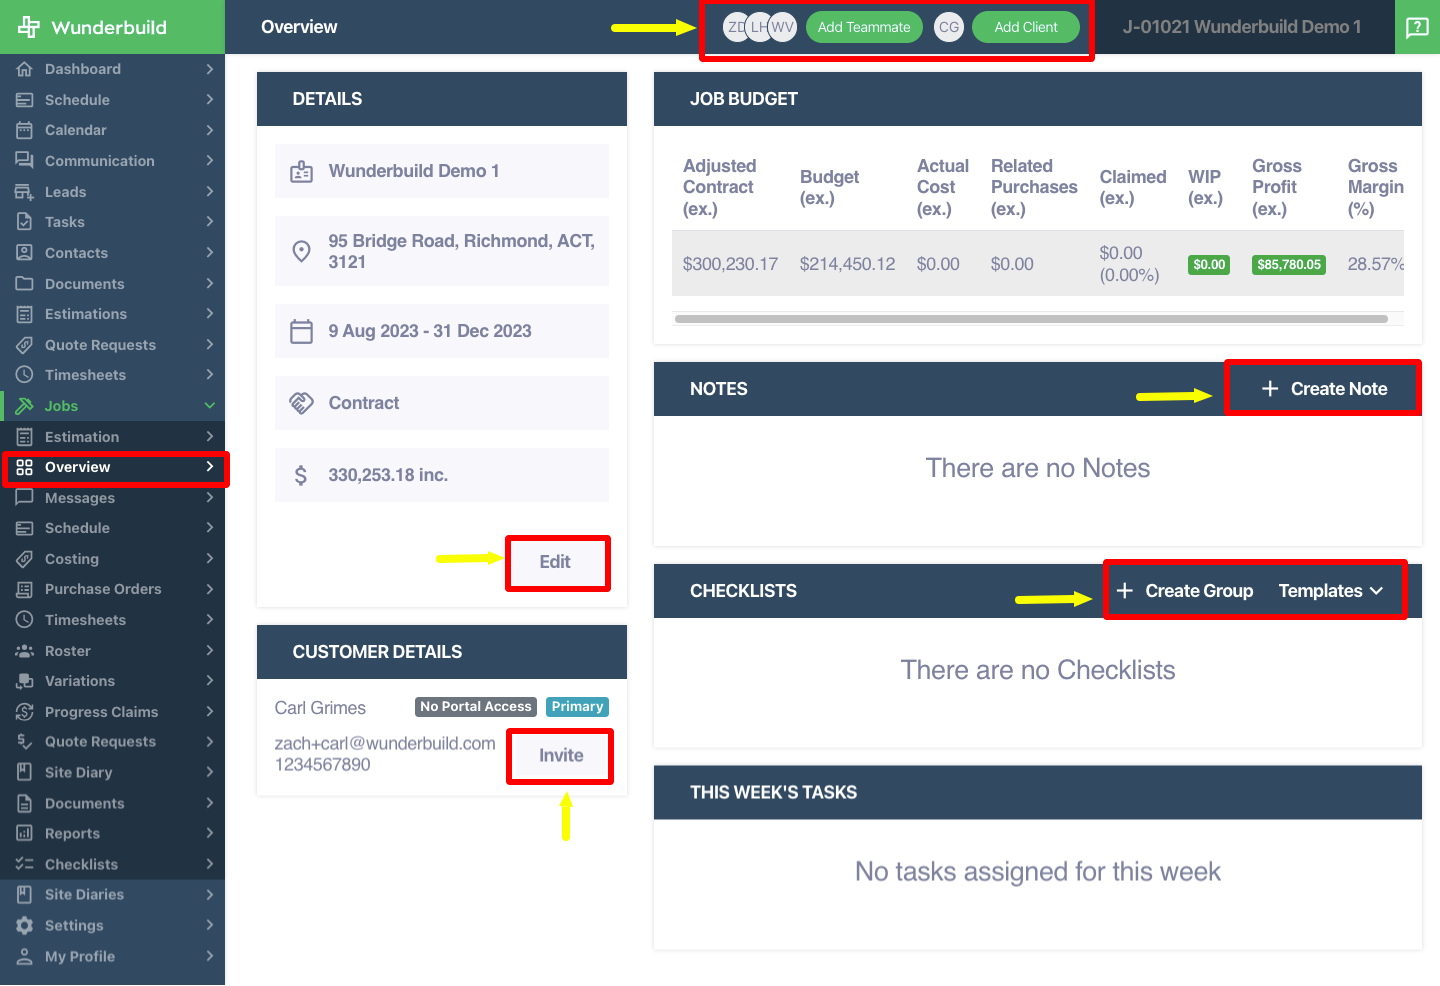
Job Overview Management
13. Accessing the Job Overview Tab: Navigate to the Job Overview tab by clicking on an existing Job
or creating a new estimation.
14. Navigating the Job Overview page:
a) Editing the Job details:
- Click "Edit" under the details to modify any information.
- Click “Update” after modifying.
b) Managing Clients and teammates:
- Invite the client through the web or app.You may also revoke client’s access in this section.
- Invite teammates and clients on the top section of the overview page.
c) Adding Notes to Job:
- Click “Create Note” to add notes to the job.
d) Checklists
- Save or import your checklist template by clicking “Templates”.
- Create your Estimation Checklists by clicking on “Create Group”.
- Add your Checklist to your current group by clicking “+ Checklist”.
- Edit or delete the checklist by clicking “Options”.
- Edit or delete the tasks by clicking on the three dots beside the checklist task.
e) Job Budget: You may view the jobs live WIP calculations on this section.
f) This Week’s Task: Will show job related tasks that is due for this week.
Managing Communications
15. Accessing the Jobs Messaging Tab: Navigate to the Jobs Messaging tab by clicking on the
Messaging subtab.
- Team Chat: Job specific team chat
- Client Chat: Job specific client chat

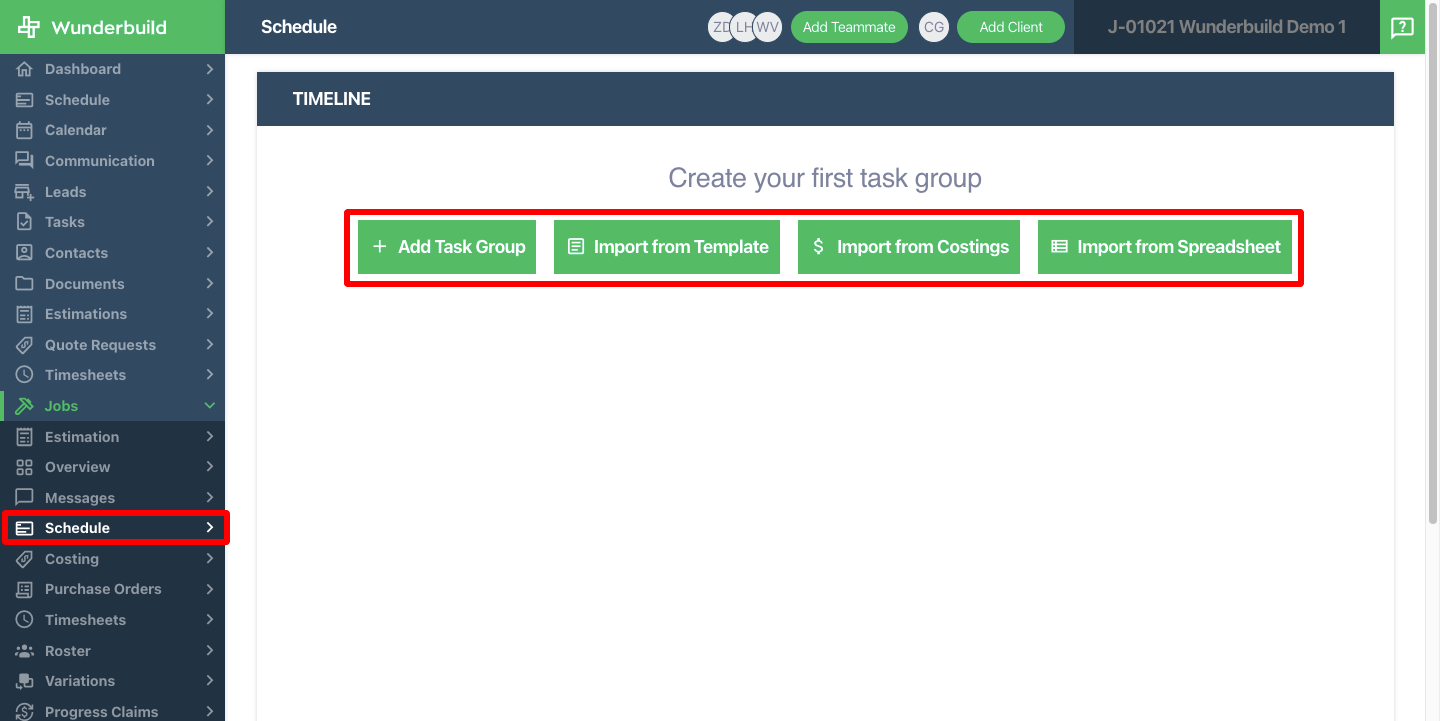
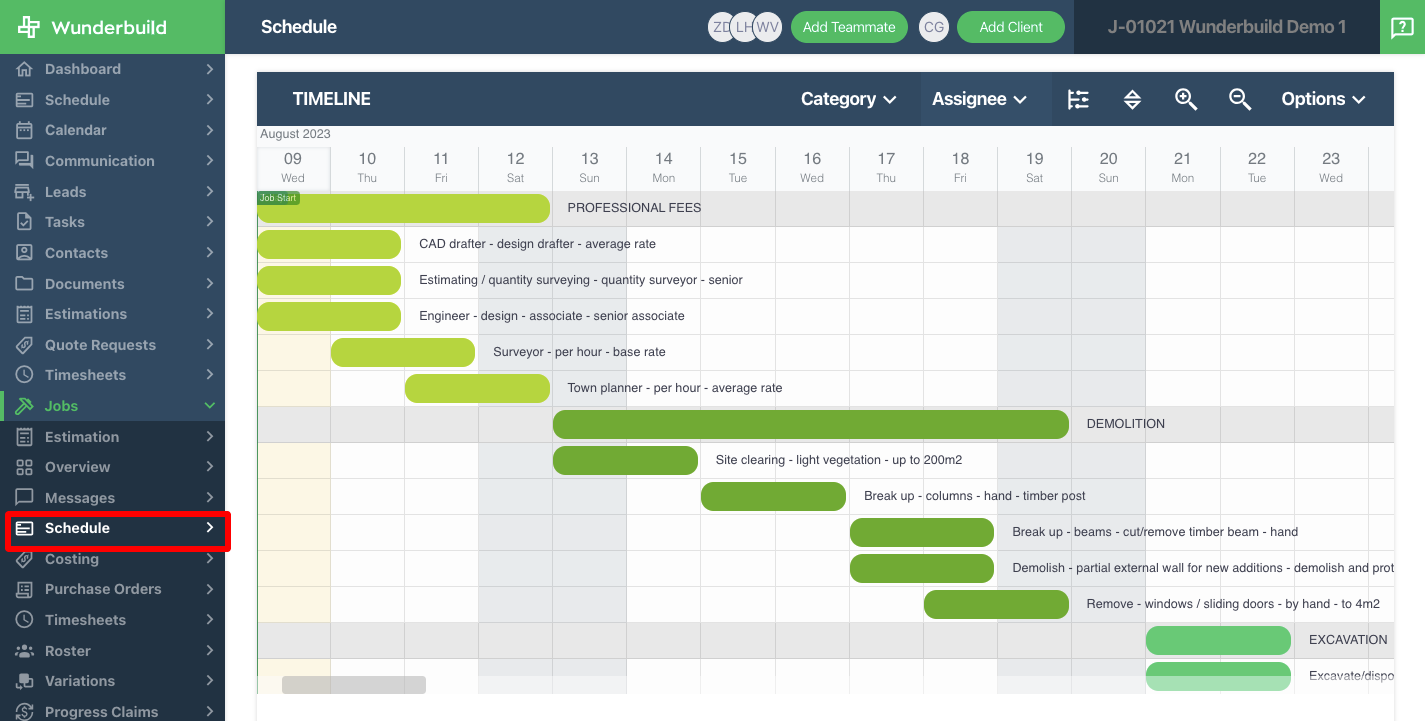
Creating And Managing a Job Schedule
16. Accessing the Jobs Schedule Tab: Navigate to the Jobs Schedule tab by clicking on the Schedule
subtab.
17. Creating a job schedule:
a) Add a task - Create a new schedule from the ground up.
b) Import from a template - Import a schedule from an existing template.
c) Import from Costings - Use your costings as a base to create your schedule.
d) Import from the Schedule - Import a schedule from a spreadsheet.
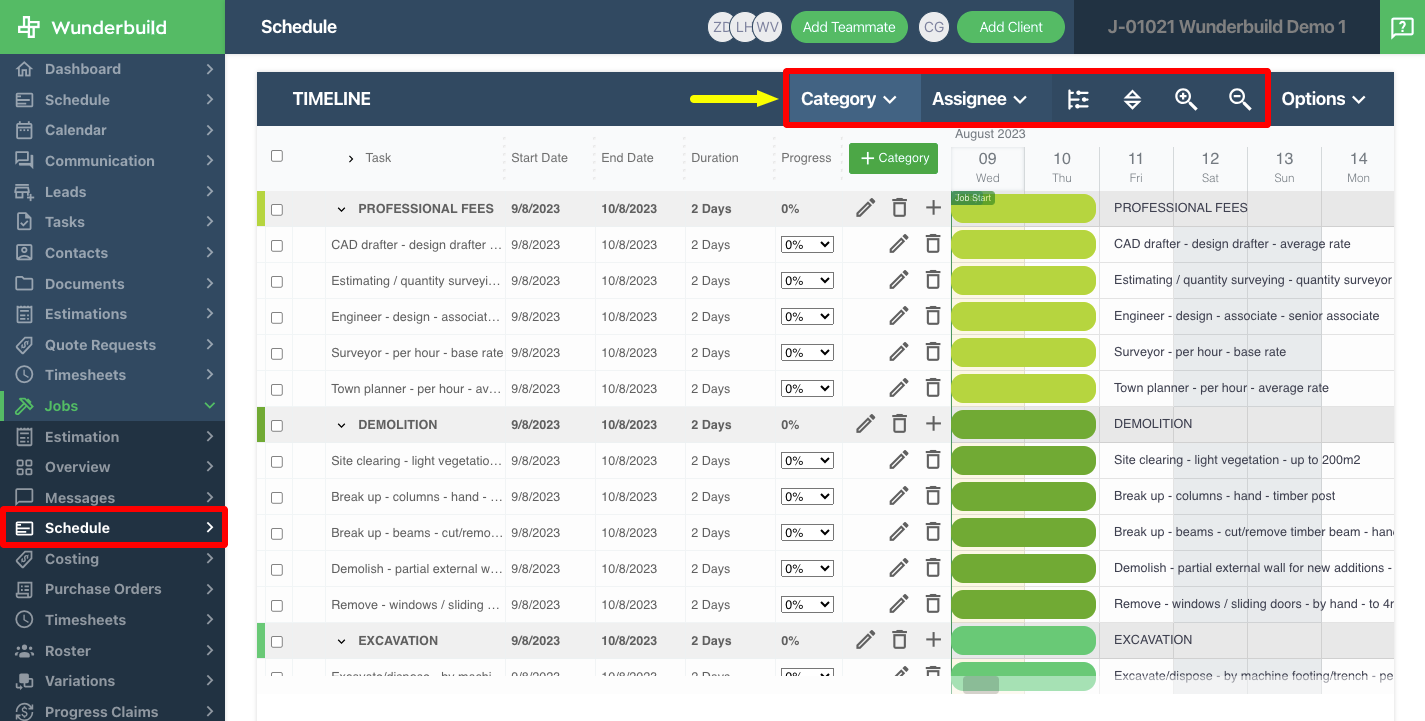
18. Accessing the toolbars:
a) Filter schedule by categories or assignees.
b) Hide task details by clicking the button beside the assignee.
c) Rearrange schedule categories and tasks by clicking on the sort tasks button.
d) Zoom in and out using the magnifying glass button.
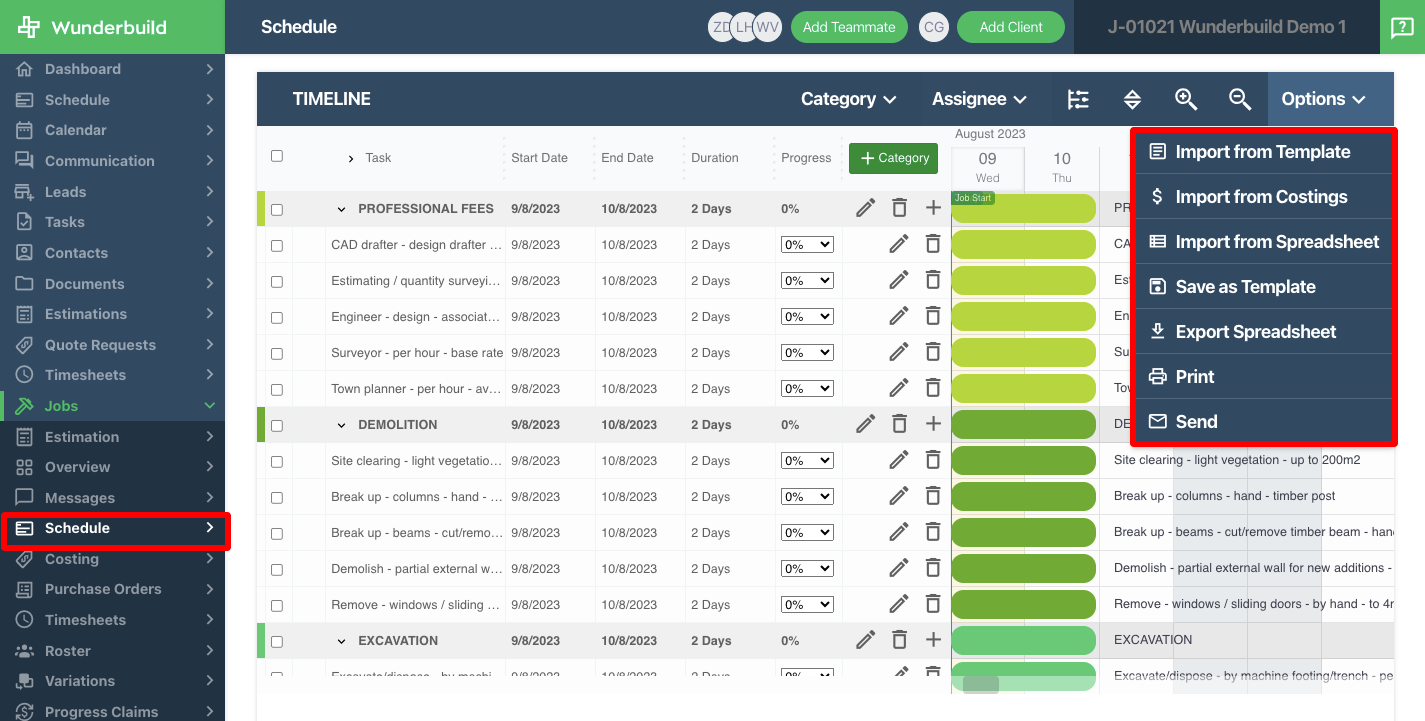
19. Timeline Options:
a) Import schedule:
- Import from a template - Import a schedule from an existing template.
- Import from Costings - Use your costings as a base to create your schedule.
- Import from the Schedule - Import a schedule from a spreadsheet.
b) Save as template : Save current schedule as a template.
c) Export Spreadsheet: Export schedule as a spreadsheet.
d) Print : Print the current schedule.
e) Send: Send schedule to teammates, suppliers or clients.
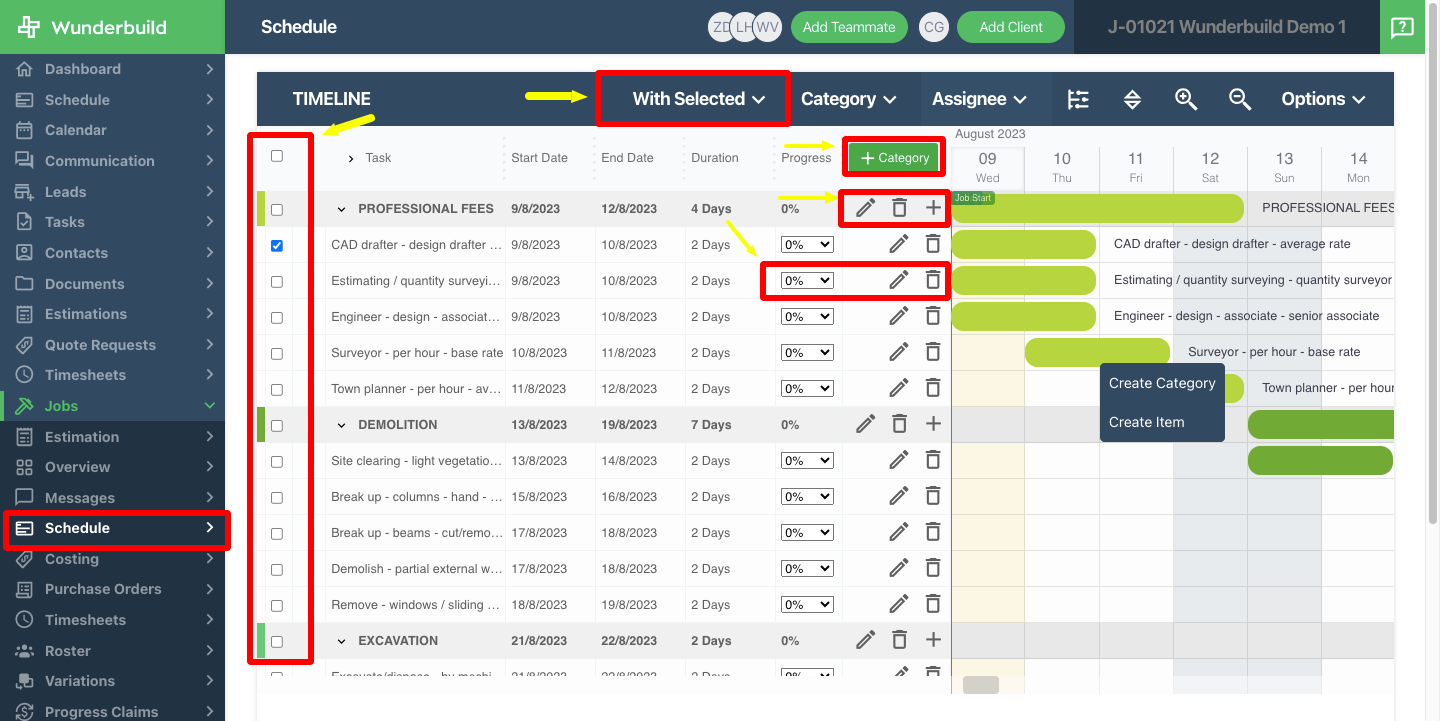
20. Managing your schedule:
a) Drag and drop an item to your desired date.
b) Setting and removing a predecessor:
- Right click on the item to set a predecessor.
- Select the item’s predecessor.
- Right click on the item to remove the predecessor.
c) Creating a link predecessor tree:
- Highlight all the tasks you would like to use for a link tree.
- Right click and select Link predecessor tree.
21. Add a new category or item:
a) Highlight a specific date/column/row where you want to add the new category or item.
b) Right click and select Create Category or Item.
22. Managing the tasks:
a) Mark a task by clicking on the checkbox beside it.
b) Click on “With Selected”
- Reschedule: Reschedule to move the schedule without dragging and dropping the item.
- Assign: Assign the task to a team member or a supplier. You may choose to send them reminders as well.
- Mark complete: Mark the item as completed.
- Delete: Delete the item.
23. Edit the category:
a) Click on the pen icon beside the category to edit the category such as date and colour.
b) Delete a category: Click on the delete icon to delete the category.
c) Click the plus button beside the category to add additional items to the category.
24. Edit a line item:
a) Change the progress of the specific item by selecting the percentage.
b) Click on the pen icon to edit a line item such as description, progress, assignee, and predecessor.
c) Click on the delete icon to delete the item.
Costings
Managing Jobs Costings
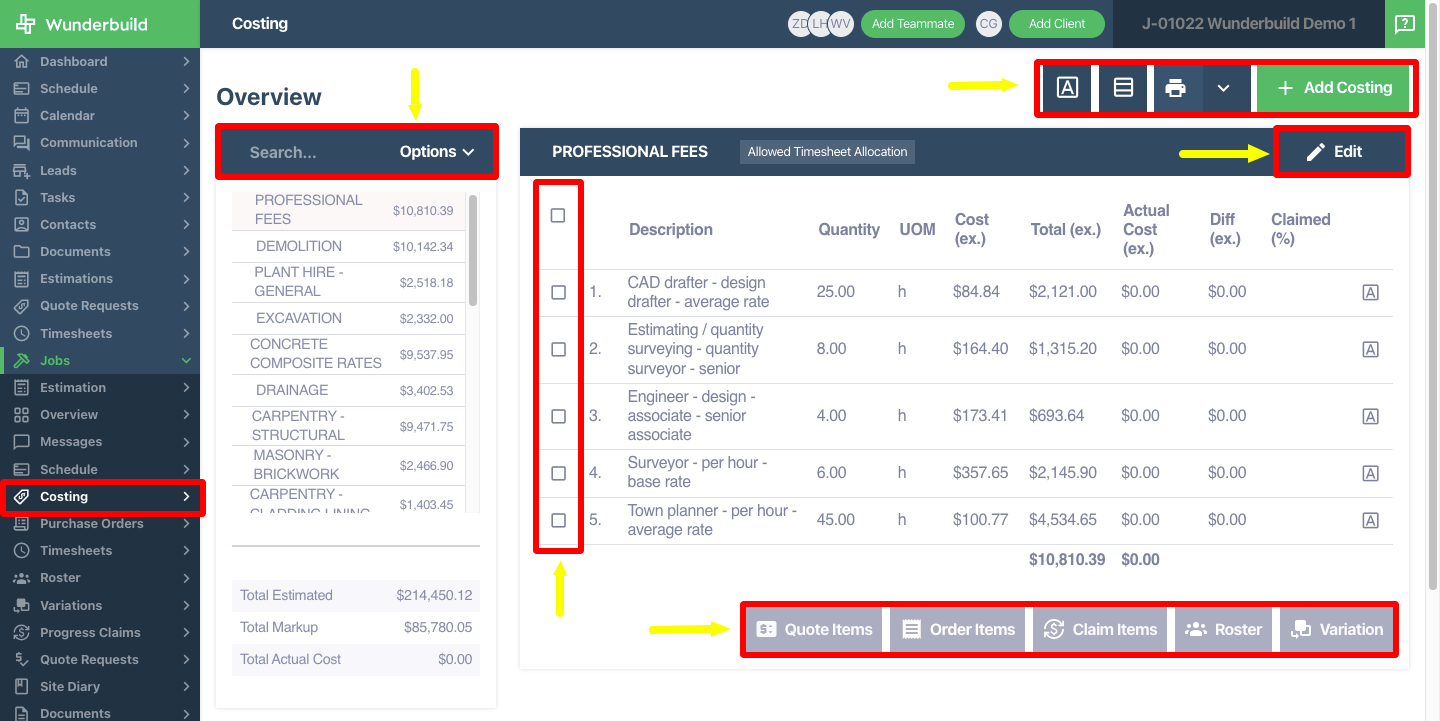
25. Accessing the Jobs Costings Tab: Navigate to the Jobs Costings tab by clicking on the Costings
subtab.
26. Navigating the Costing Tab:
a) Switch to Allowance Report:
- Clicking the “A” button.
- Click the print icon to export the allowance report.
b) Switch views to categories overall cost:
- Click the list icon beside the print button.
c) Export Costings report:
- Click on the dropdown beside the print icon.
- Customise which items you would like to include in the cost report.
- Click on the print icon to export the report.
Create And Edit Costings
27. Add a new costing:
- Click on “+ Add Costing”.
- Create a Category.
- Toggle Costing Items such as notes and GST related items.
- Add your Items, Quantity, Unit of Measurement, Costs, and Markup (optional).
- Click “Update” to save.
28. Category Search Bar: Search a certain category.
29. Costing options:
- Import costings via spreadsheet.
- Print bill of quantity.
- Download the costings as an excel spreadsheet.
30. Edit Costings:
- Edit current items by clicking the “Edit” button.
- Toggle timesheet allocation to disable timesheet allocation to the specific category.
Create Quote Requests
31. Create Quote requests:
- Select item/s you would like to request for a Quote.
- Click on “Quote Items”.
- Fill in the fields, add attachments or share the plans.
- Click on “Save”.
- Construct an email to Supplier.
- Proceed to Quote Request subtab.
Create Purchase Orders And Expenses
32. Order Items:
a) Create Purchase orders:
- Click on Order Items > Purchase orders
- Fill up necessary fields.
- Click Create.
- Proceed to Purchase orders tab.
b) Add an expense:
- Click on Order Items > Add expenses
- Fill up necessary fields and adjust cost if necessary.
- Click Create.
- A received purchase order will be created and cost will be allocated immediately.
Create Progress Claims
33. Claim items:
- Select items you would like to claim.
- Click Claim Items.
- Add the percentage or costs you would like to claim.
- Click Create.
- Proceed to Progress Claims.
Create Roster Items
34. Create roster:
- Select items you would like to create a roster.
- Click Roster.
- Add the percentage or costs you would like to claim.
- Create your roster - and fill necessary information.
- Click Create.
- Proceed to Roster.
Create Variations
35. Create item variation
- Select items you would like to create variations to.
- Click Variations.
- Add your variation.
- Click Create.
- Proceed to Variation.
Create and Manage Purchase Orders
36. Accessing the Jobs Purchase Order Tab: Navigate to the Jobs Purchase Order tab by clicking on
the Purchase Order Subtab.
37. Filtering the purchase orders:
- Search for the Purchase Order using the search bar.
- Filter the Purchase order by status.
38. Creating a new purchase order:
- Click on “Create New”.
- Fill in necessary information for the purchase order.
- Click “Create”.
39. Navigating the Purchase Order tab.
- Click on the desired purchase order to view its details.
40. Editing the purchase order:
- Click on “Options” dropdown menu.
a) Print the purchase order.
b) Send the purchase order.
c) Receive the purchase order.
d) Edit the purchase order.
e) Delete the purchase order.
f) Sync with Xero.

Accessing Timesheets Through Your Job
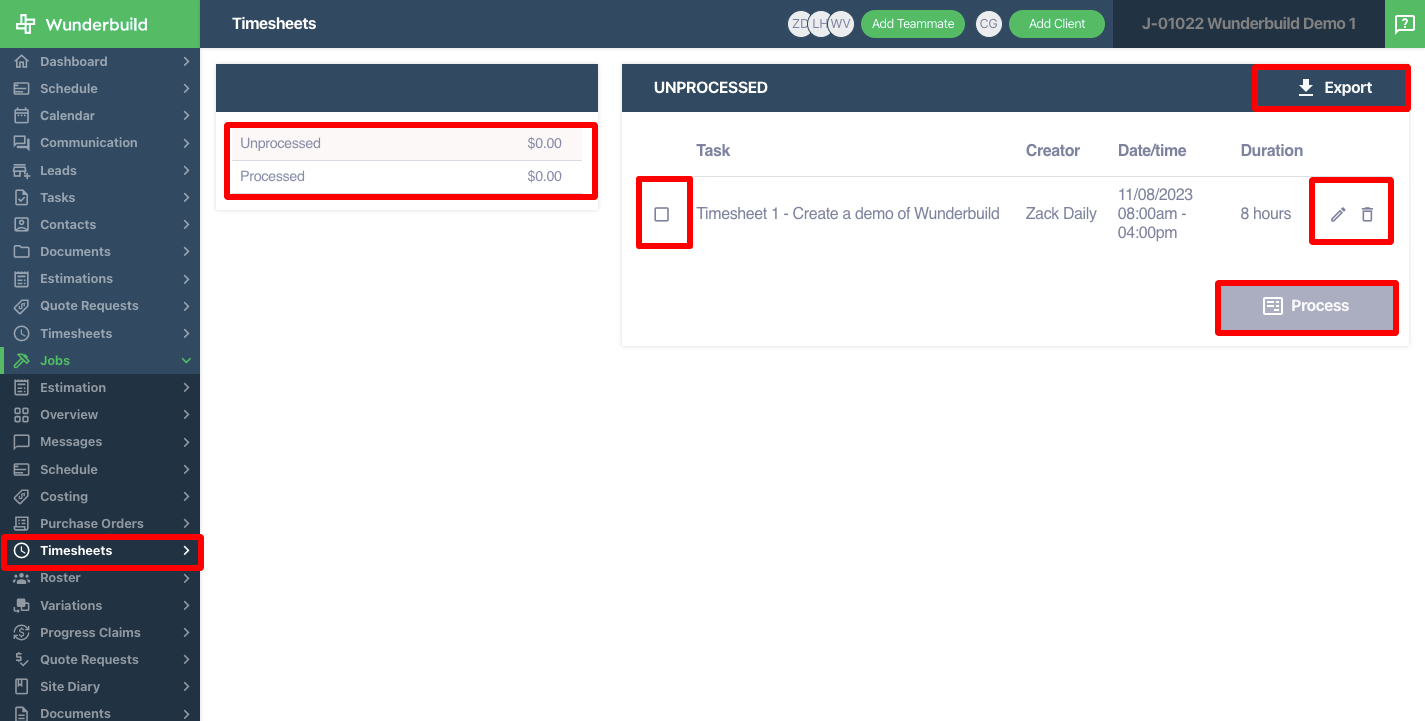
41. Accessing the Jobs Timesheets Tab: Navigate to the Jobs Timesheets tab by clicking on the
Timesheets Subtab.
42. Navigating the Timesheets tab.
- Click on either Processed or Unprocessed to view the timesheets related to it.
43. Exporting Timesheets:
- Click on the export button to export your timesheets.
44. Editing a timesheet:
a) Updating the timesheet:
- Click on the icon beside the timesheet to update it.
- Update necessary information.
- Click “Update”
b) Deleting the timesheet:
- Click on the trash icon beside the timesheet to delete it.
45. Processing timesheet/s.
- Mark the timesheet/s you would like to process.
- Click on the “Process button”.
- Provide necessary information.
- You may allocate the timesheet to a specific costing by choosing a category and clicking the link icon.
- “Click on Process”.
46. Un-processing a timesheet:
- Navigate to the processed timesheet.
- Click on the clock icon beside the timesheet.
- Confirm the un-processing.
Create And Manage Rosters
47. Accessing the Jobs Roster Tab: Navigate to the Jobs Roster tab by clicking on the Roster Subtab.
48. Filtering the Roster:
- Search for the Roster using the search bar.
- Filter the Roster by status.
49. Creating a new Roster:
- Click on “Create New”.
- Fill in necessary information for the Roster.
- Click “Create”.
50. Navigating the Roster tab.
- Click on the desired Roster to view its details.
51. Editing the Roster:
a) Click on the “Options” dropdown menu.
- Print the Roster.
- Send the Roster.
- Approve the Roster.
- Edit the Roster.
- Delete the Roster.

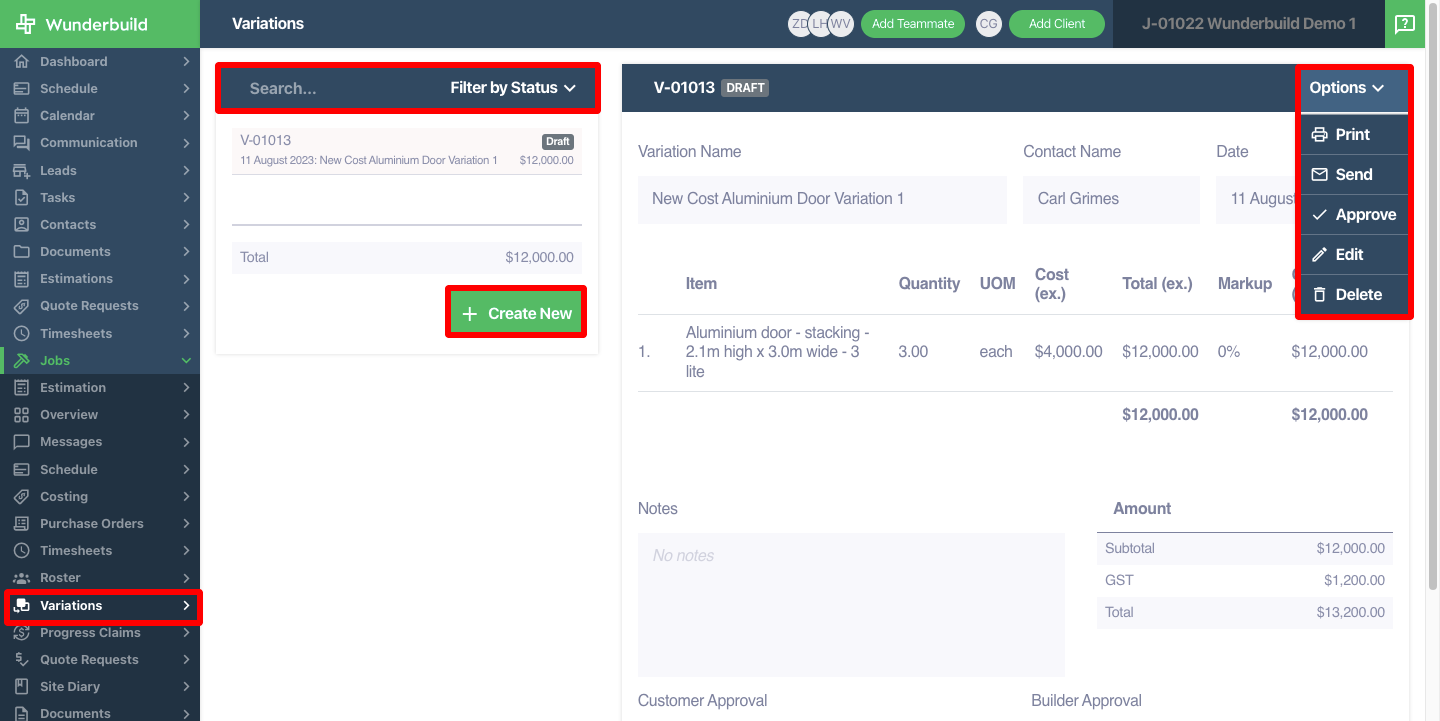
Create Variations
52. Accessing the Jobs Variations Tab: Navigate to the Jobs Variations tab by clicking on the Variations
Subtab.
53. Filtering the Variations:
- Search for the Variations using the search bar.
- Filter the Variations by status.
54. Creating a new Variations:
- Click on “Create New”.
- Fill in necessary information for the Variations.
- Click “Create”.
55. Navigating the Variations tab.
- Click on the desired Variations to view its details.
56. Editing the Variations:
a) Click on the “Options” dropdown menu.
- Print the Variations.
- Send the Variations.
- Approve the Variations.
- Edit the Variations.
- Delete the Variations.
Create Progress Claims
57. Accessing the Jobs Progress Claims Tab: Navigate to the Jobs Progress Claims tab by clicking on
the Progress Claims Subtab.
58. Configuring your progress claim:
a) Standard: Include/Exclude your variations from progress claims.
b) Retention: Choose an amount or percentage that the customer will retain until project completion. Include/Exclude your variations from progress claims.
59. Create a progress claim by clicking on the “+Create Progress Claim” button.

60. Create a progress claim by clicking on the “+Create Progress Claim” button.
- Fill up necessary fields.
- Enter a fixed amount or percentage of the contract.
- Click “Create”.

61. Filtering the Progress Claims:
- Search for the Progress Claims using the search bar.
- Filter the Progress Claims by status.
62. Printing multiple progress claims:
- Select progress claims you would like to print.
- Click “With Selected”.
- Select “Print Statement”.
63. Creating a new Progress Claims:
- Click on “Create New”.
- Fill in necessary information for the Progress Claims.
- Click “Create”.
64. Navigating the Progress Claims tab.
- Click on the desired Variations to view its details.
65. Editing the Progress Claims:
- Click on the “Options” dropdown menu.
a) Print the Progress Claims.
b) Send the Progress Claims.
c) Receive the Progress Claims.
d) Edit the Variations.
e) Delete the Variations.
f) Sync with Xero.

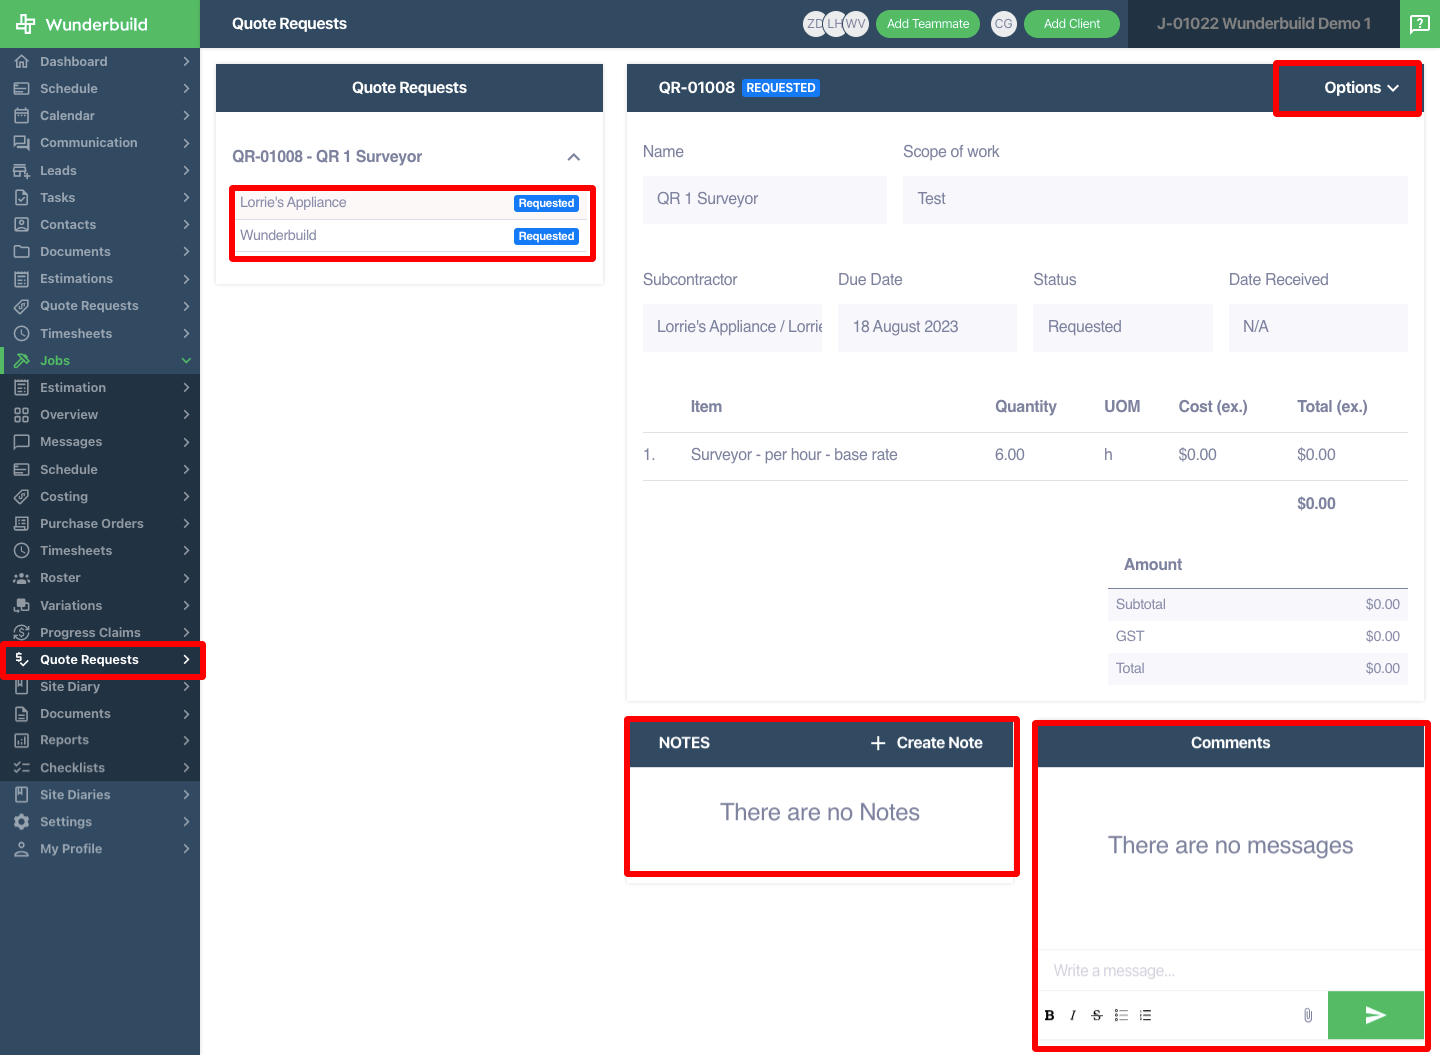
Manage Quote Requests
66. Accessing the Jobs Quote Request Tab: Navigate to the Jobs Quote Request tab by clicking on
Quote Request under the Jobs Tab
67. Navigating the Jobs Request subtab.
a) Click the Quote Request to navigate between each Quote Request.
b) Editing the Quote Request.
- Click on the Options button to either print, send, or manually fulfil the Quote Request.
- Click Print Request to print your Quote request.
- Click Send your request to the supplier.
- Click on Manual Entry to manually enter the cost given by the supplier.
c) Create a note on a Quote Request.
- Click on “Create Note” to create a note on a Quote request.
d) You will see the supplier’s replies on the Comments section. You may choose to reply to the supplier
by entering your message and clicking on the Send icon.
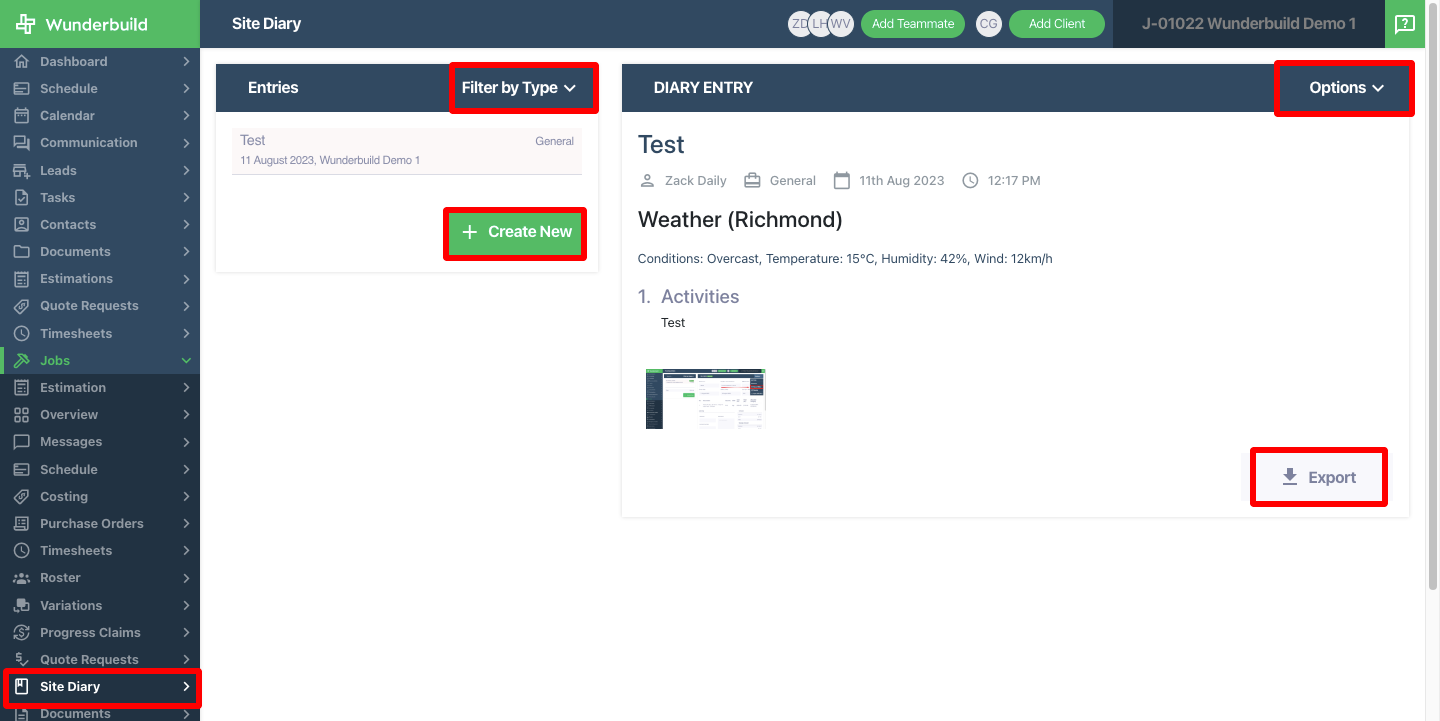
Create And Manage Site Diaries
68. Accessing the Jobs Site Diary Tab: Navigate to the Jobs Site Diary tab by clicking on the Site
Diary Subtab.
69. Creating a Site Diary: Please create site diary prior to using this function otherwise use the
template provided by Wunderbuild
- Click on “+ Create Diary Entry”
- Select a template.
- Fill up necessary information.
- Click Save.
70. Filtering Site Diary: Click Filter Type to filter by templates used.
71. Create a new Site Diary by clicking the “+Create New”.
72. Modifying a site diary:
- Edit Site Diary.
- Share site diary with the client.
- Clone Site Diary.
- Delete Site Diary.
73. Exporting Site Diary: Click on the “Export” button to export site diary.
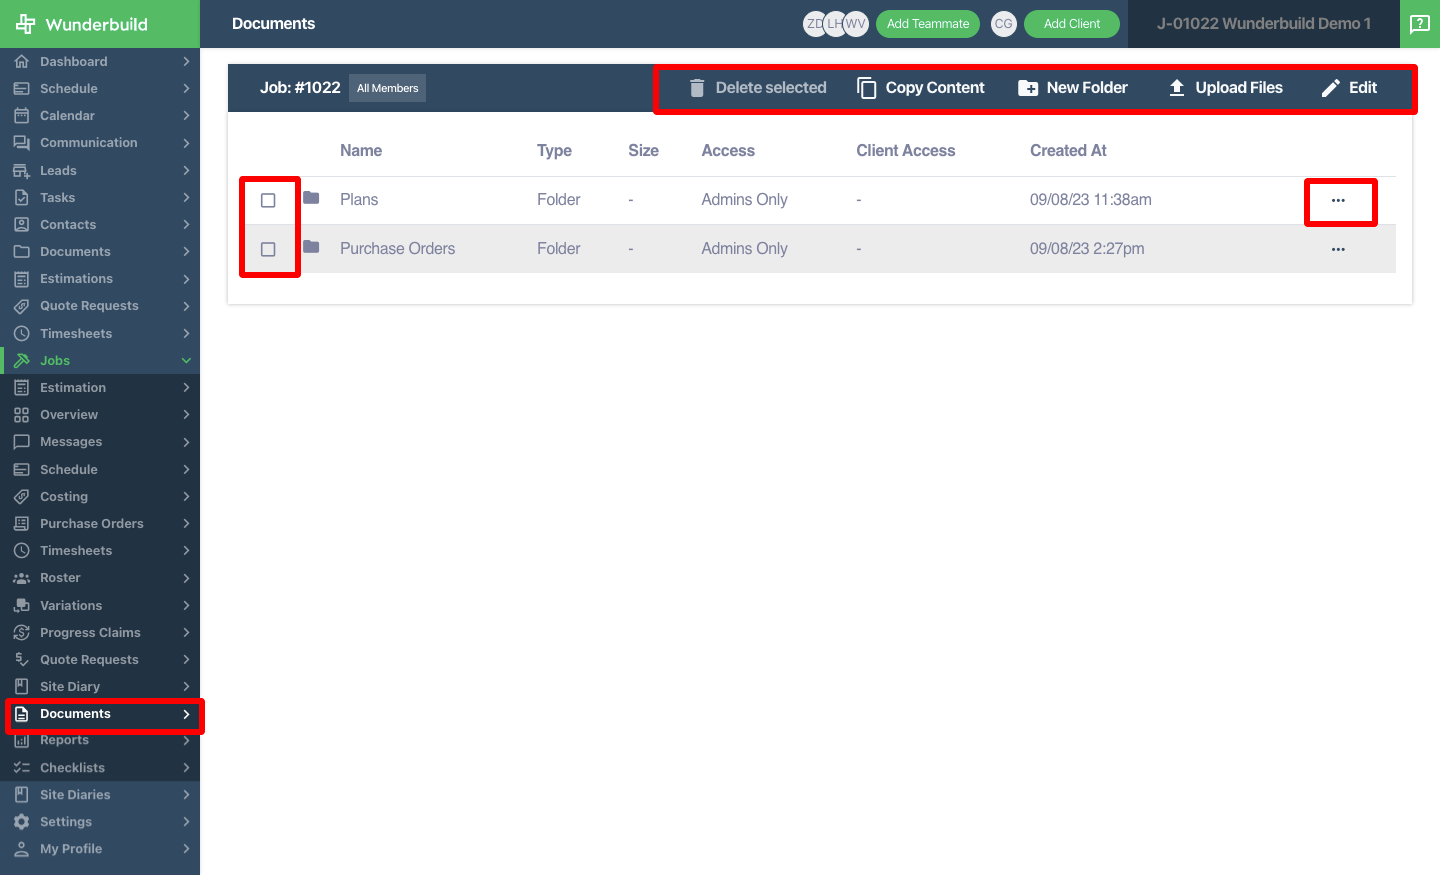
Create And Manage Documents
74. Accessing the Jobs Documents Tab: Navigate to the Jobs Documents tab by clicking on
Documents under the Jobs Tab.
75. Navigating the Documents Tab: Navigate through each folder by clicking the folders or go back to
the root folder by clicking the jobs title ie. Jobs#x.
76. Delete folder/s or file/s. Tick necessary checkboxes and click on Delete selected.
77. Copy folder/s or file/s. Tick necessary checkboxes and click on Copy selected.
78. Create a new folder: Click on “New Folder” and enter the desired name.
79. Upload files to a folder by clicking “Upload files”.
80. To edit the current folder click on “Edit”.
81. To edit a file or a folder click on the three dots beside the file/folder.
a) Delete the file/folder.
b) Edit the file/folder name.
c) Copy the file or folder.
d) Share the folder with the client.
View Job Reports
82. Accessing the Jobs Reports Tab: Navigate to the Jobs Reports tab by clicking on Reports under
the Jobs Tab.
83. Navigating the Jobs Reports Tab: Click on your desired reports via the name category.
84. Exporting the Reports:
- Click on the category you would like to export.
- Click on the Export button.
85. Invoice reports:
- Click on the magnifying glass beside the item to go to the actual receipt.

Related Articles
Estimation User Guide
Managing Your Estimations Manage Existing Estimations 1. Accessing the Estimation Management Tab: Navigate to the Estimation Management tab on the main menu to view the visual board of all the estimations. 2. Modify an Estimation: Click the three ...Wunderbuild Job Schedule 2.0 User Guide
Importing The following is a guide on the updated Wunderbuild job schedule. To begin go to your jobs then schedule section inside your job. 1. Click ‘options’ on your schedule to import your schedule into Wunderbuild. Below are instructions on the ...Leads Management Guide
Accessing the Lead Management Tab: Navigate to the Lead Management tab on the main menu to view the visual board of leads. Understanding the Lead Board: Each column on the board represents a different stage of a lead. Creating a New Lead: Click the ...Site Diary User Guide
1. Accessing the Site Diaries Tab: Navigate to the Site Diaries tab by clicking on Site Diaries in the main menu to see all your Site Diaries in Wunderbuild. 2. Filtering the Site Diary Tab: a) Filter by date. b) Filter by Job. c) Filter by Site ...App Jobs User Guide
1. Accessing the Job List: Navigate to the Job List tab tab by clicking on the clipboard icon in the bottom left corner. 2. Navigating the Job List section: Use the search bar to search your desired job in Wunderbuild. Click on the job name to access ...