Xero Integration Guide
In Wunderbuild, utilise our Xero integration to sync progress claims on work completed and purchase orders made to suppliers as bills to pay and invoices in Xero. The following is a guide on connecting to Xero and having your data seamlessly integrate to it so you are on top of your finances.
Connecting to Xero
You need to have an account on Xero before you can connect it to Wunderbuild. If you don’t have an account on Xero you can sign up here.
Xero will provide you with a default revenue and expense account. Revenue is income earned so “invoices” once paid will count as revenue and expenses are costs your business has incurred; these will be purchase orders for materials/labour you have ordered from suppliers.
Syncing Wunderbuild with Xero Accounts
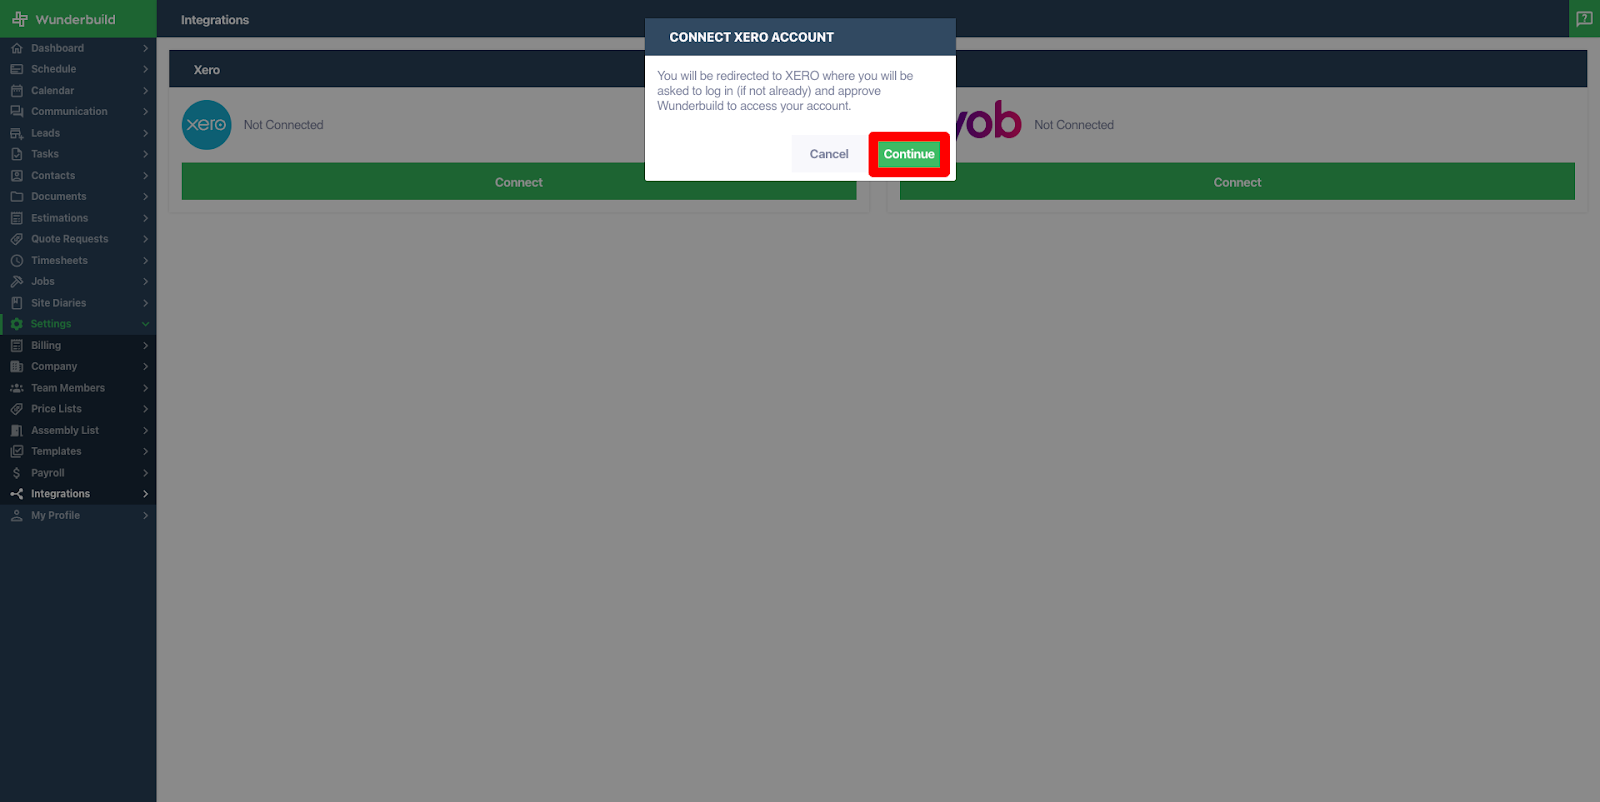
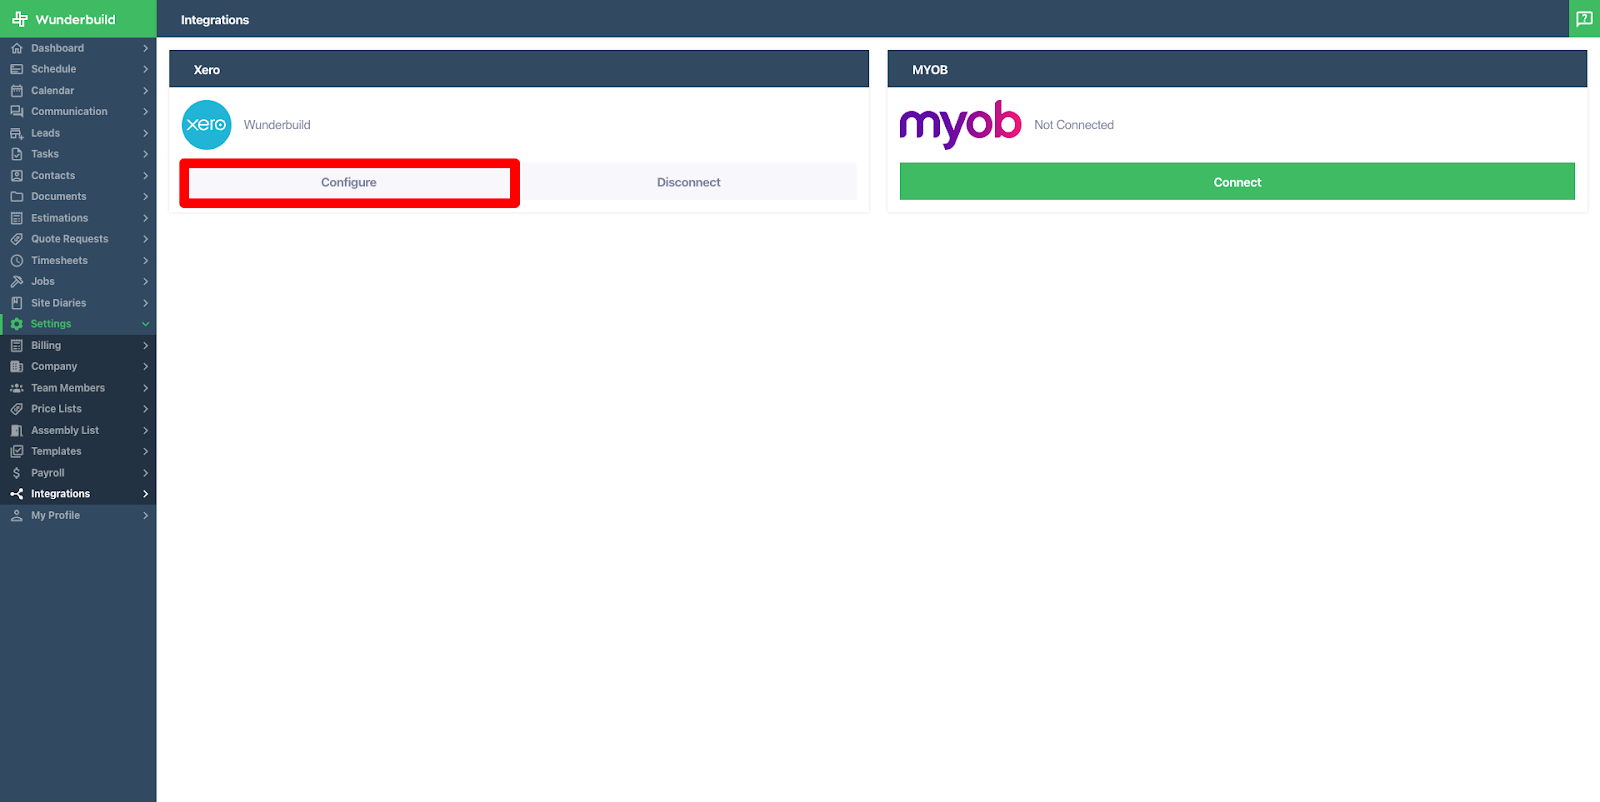
Head to Settings > Integrations
On the left you will see Xero. Click ‘Connect’ and you will be taken to Xero to sign in to your account there and then redirected back to Wunderbuild.

Configure Xero Settings
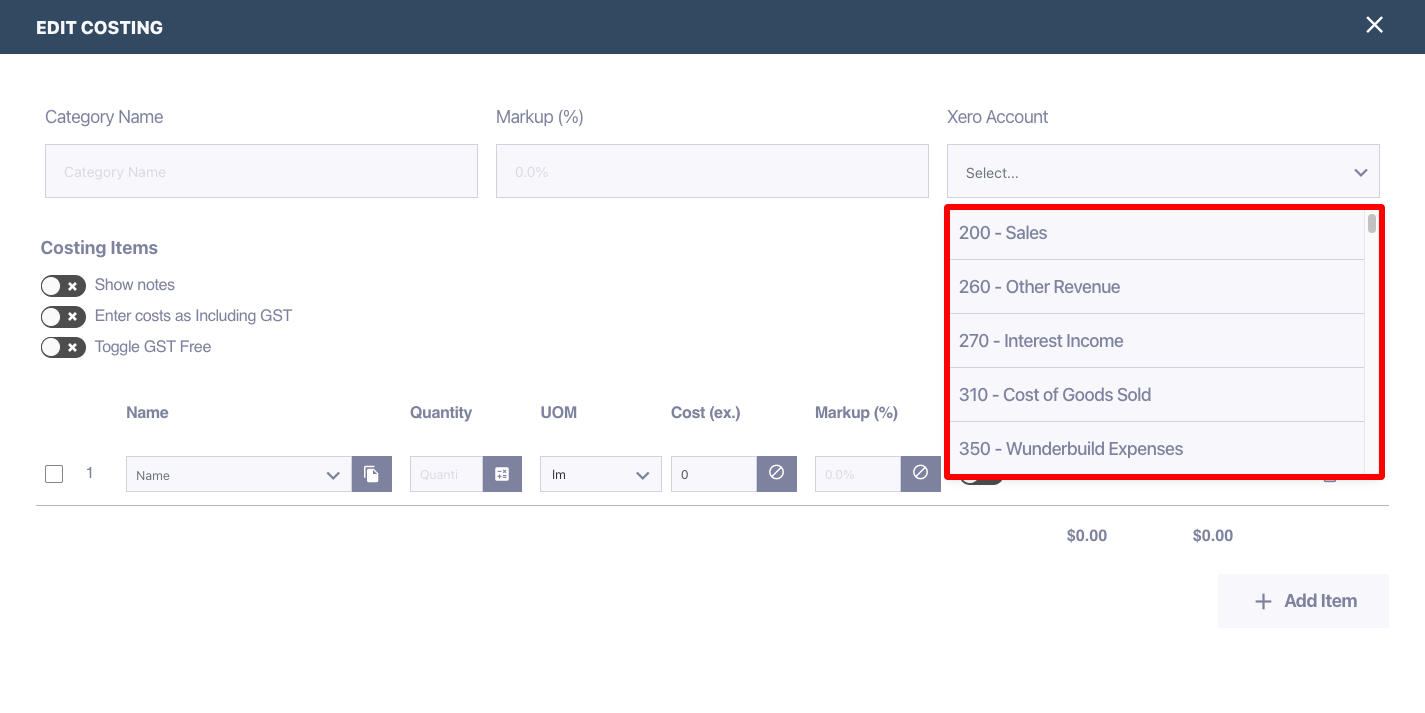
The first time you connect your Xero account to Wunderbuild, you will see a pop up with the Xero configuration settings. If configuring at a later stage, click the ‘Configure’ button to begin configuring your Xero settings. The first setting we will look at is choosing your income and expense accounts.
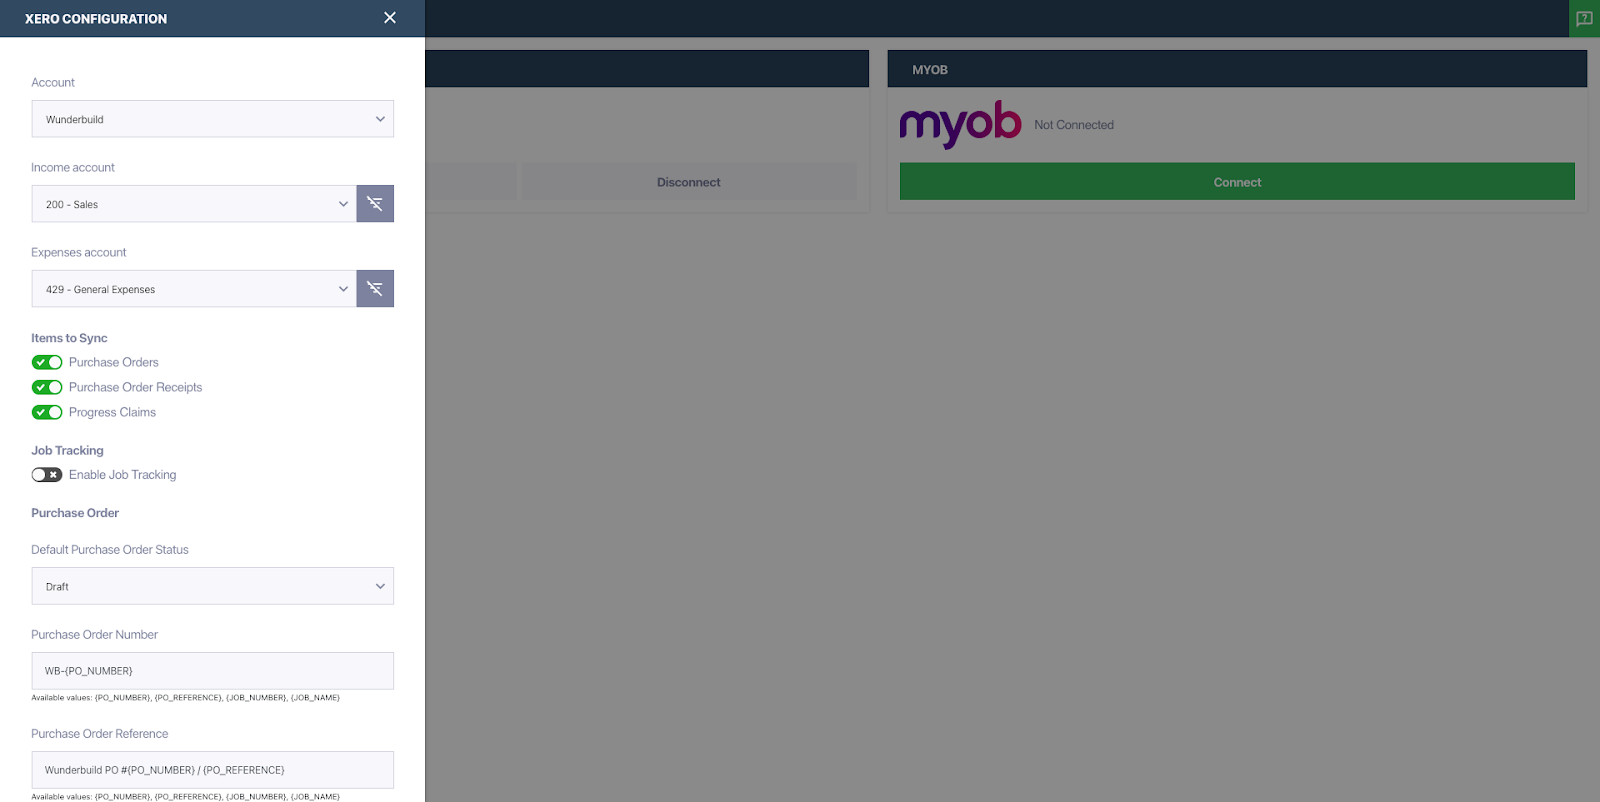
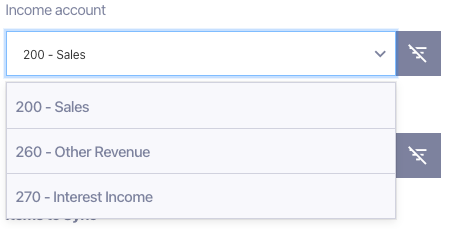
Choose Income/Expense accounts in Xero to connect to Wunderbuild
For the fields ‘Income account’ and ‘Expense account’, choose one account from each to connect to Wunderbuild.

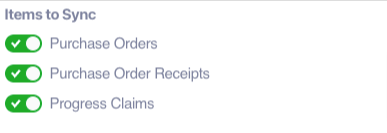
You can toggle the items you want to sync to Xero:
- Purchase Orders are orders for materials/labour from suppliers.
- Purchase Order Receipts are the receipts you receive after you have received your order from a supplier.
- Progress Claims are claims for work you have done on a job and represent invoices to your client.
Job Tracking
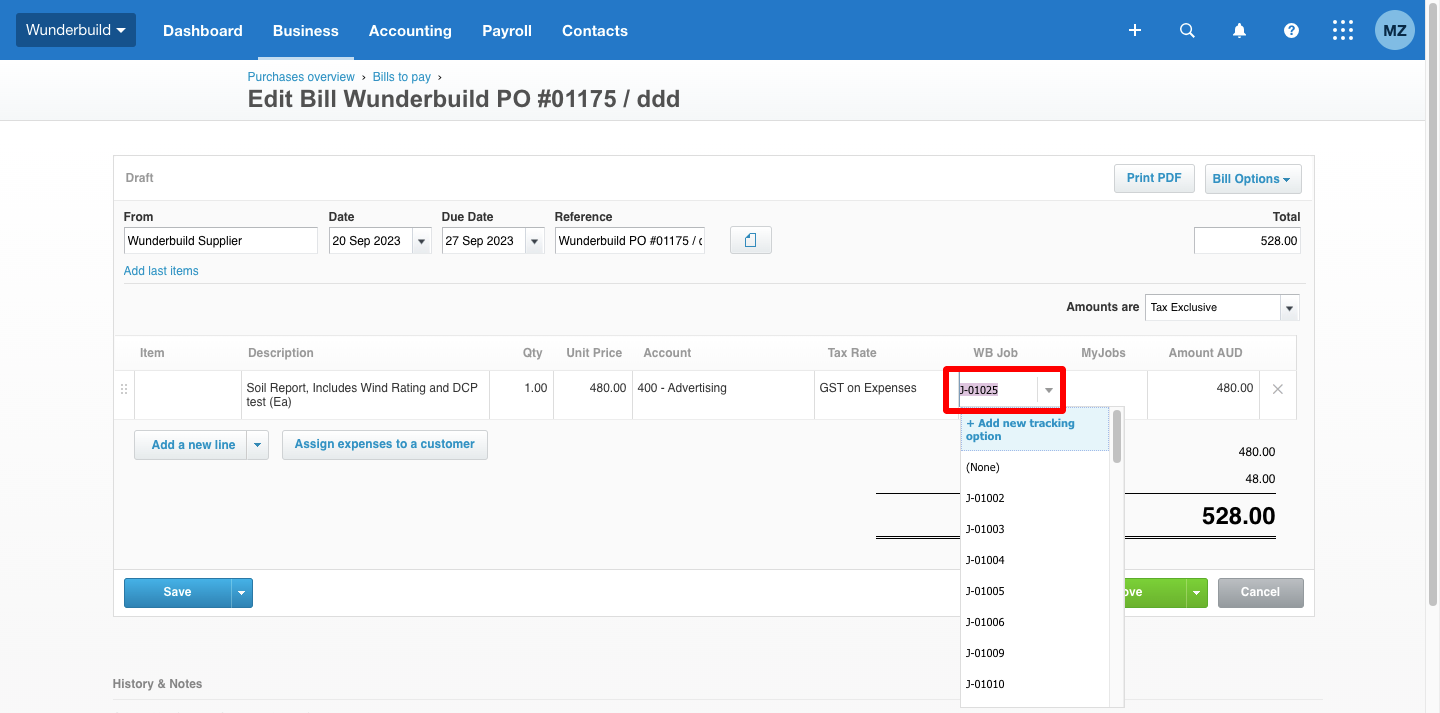
When a Progress claim/Purchase Order/Purchase Order Receipt is created, it will add a column beside each item to show the Job number. This will allow you to generate reports on Xero specific to a job.

Xero References
In Wunderbuild you can customise references and numbers for purchase orders, purchase order receipts and progress claims to be added for when they are synced to Xero.
- {PO_NUMBER} = Number of the purchase order being synced to Xero.
- {PO_REFERENCE} = Reference of the purchase order being synced to Xero.
- {JOB_NUMBER} = Job number related to either purchase order or progress claim being synced to Xero.
- {JOB_NAME} = Job name related to either purchase order or progress claim being synced to Xero.
- {PO_RECEIPT_REFERENCE} = Receipt reference of purchase order being synced to Xero.
- {PC_NUMBER} = Number of the progress claim being synced to Xero.
- {PC_DESCRIPTION} = Description of progress claim being synced to Xero.
Purchase Order
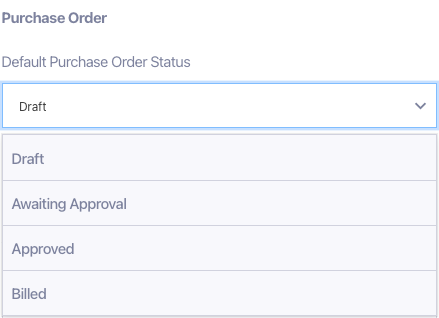
Set Purchase Order Status
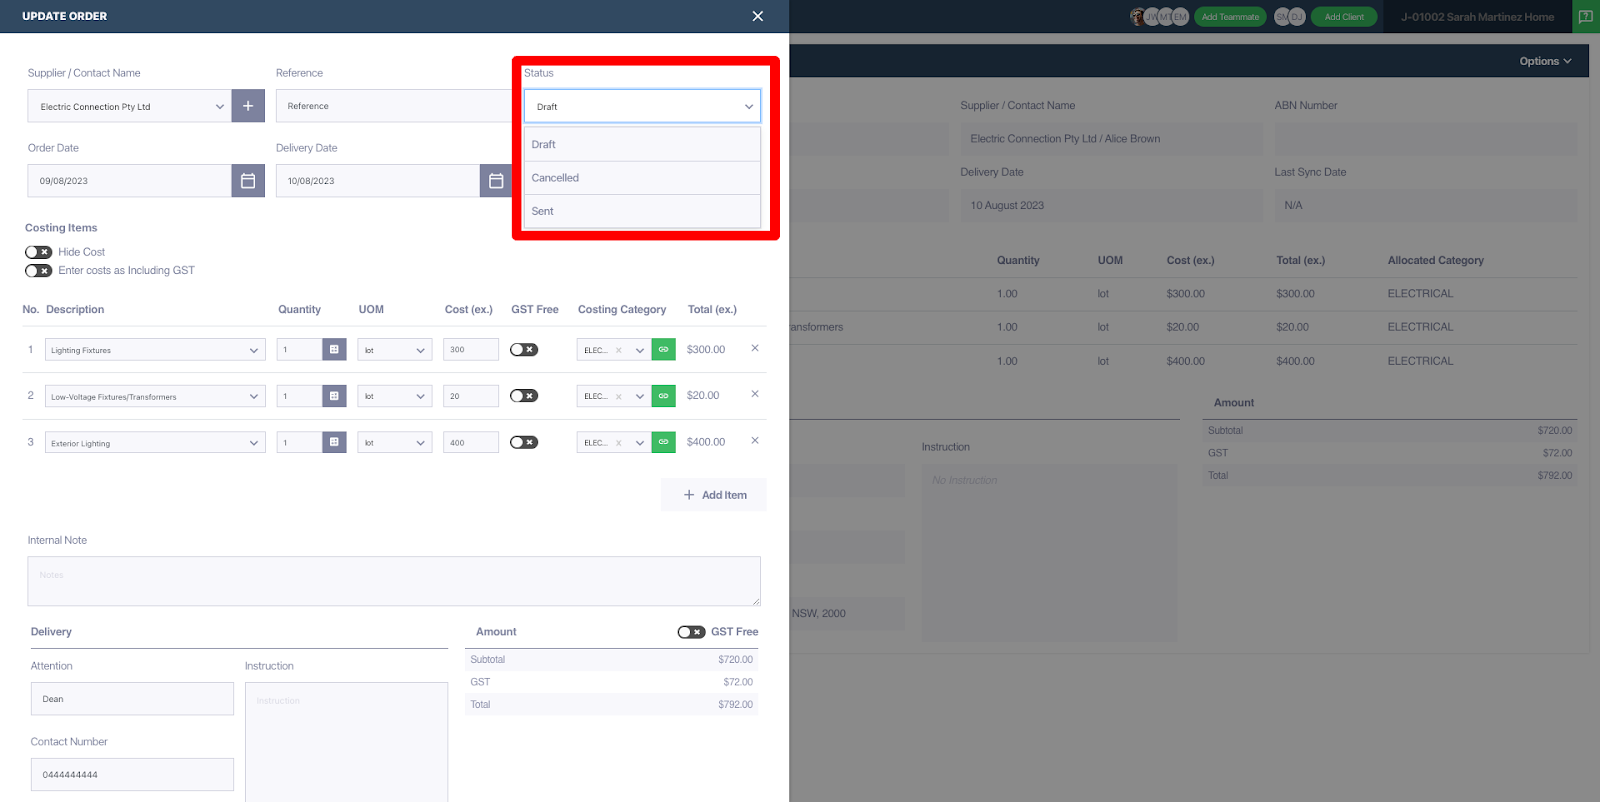
Select your default purchase order status. Purchase orders are either in ‘Draft’, ‘Awaiting Approval’, ‘Approved’ or ‘Billed’.
Purchase Order Number
This field has a default value of “WB-{PO_NUMBER}”. As an example, it will appear in Xero as "WB-01234", with 01234 being the Purchase Order number from Wunderbuild.
You can customise this format and add from the following values:
- {PO_NUMBER}
- {PO_REFERENCE}
- {JOB_NUMBER}
- {JOB_NAME}
Purchase Order Reference
This field has a default value of “Wunderbuild PO #{PO_NUMBER} / {PO_REFERENCE} ”. As an example, it will appear in Xero as "Wunderbuild PO #01234 / Sample Ref", with 01234 being the Purchase Order number and "Sample Ref" being the reference you wrote on the Wunderbuild Purchase Order.
You can customise this format and add from the following values:
- {PO_NUMBER}
- {PO_REFERENCE}
- {JOB_NUMBER}
- {JOB_NAME}

Purchase Order Receipt
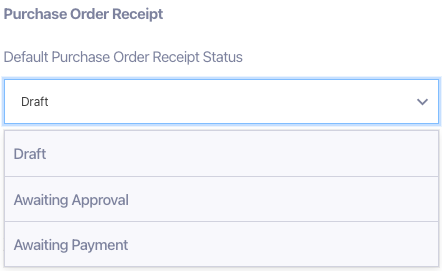
Set Purchase Order Receipt Status
Select your default purchase order status. Purchase orders are either in ‘Draft’, ‘Awaiting Approval’ or ‘Awaiting Payment’.
Purchase Order Receipt Reference
This field has a default value of “Wunderbuild PO #{PO_NUMBER} / {PO_RECEIPT_REFERENCE}”, which means when a purchase order receipt is synced to Xero as a bill it will by default have its related purchase order numbers as well as the reference value for the purchase order receipt.
You can customise this format and add from the following values:
- {PO_NUMBER}
- {PO_REFERENCE}
- {PO_RECEIPT_REFERENCE}
- {JOB_NUMBER}
- {JOB_NAME}

Progress Claim
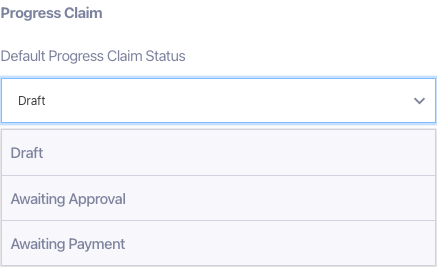
Set Progress Claim Status
Select your default progress claim status. Purchase orders are either in ‘Draft’, ‘Awaiting Approval’ or ‘Awaiting Payment’.
Progress Claim Number
This field has a default value of “WB-{PC_NUMBER}”. As an example, it will appear in Xero as "WB-01234", with 01234 being the Progress claim number from Wunderbuild.
You can customise this format and add from the following values:
- {PC_NUMBER}
- {PC_DESCRIPTION}
- {JOB_NUMBER}
- {JOB_NAME}
Progress Claim Reference
This field has a default value of “Wunderbuild PC #{PC_NUMBER}”. As an example, it will appear in Xero as "Wunderbuild PC #01234", with 01234 being the Progress claim number from Wunderbuild.
You can customise this format and add from the following values:
- {PC_NUMBER}
- {PC_DESCRIPTION}
- {JOB_NUMBER}
- {JOB_NAME}

Lastly, once you are done configuring your settings, click ‘Save’.
Manually Sync Purchase Orders/Purchase Order Receipts/Progress Claims in Wunderbuild
Creating Purchase orders
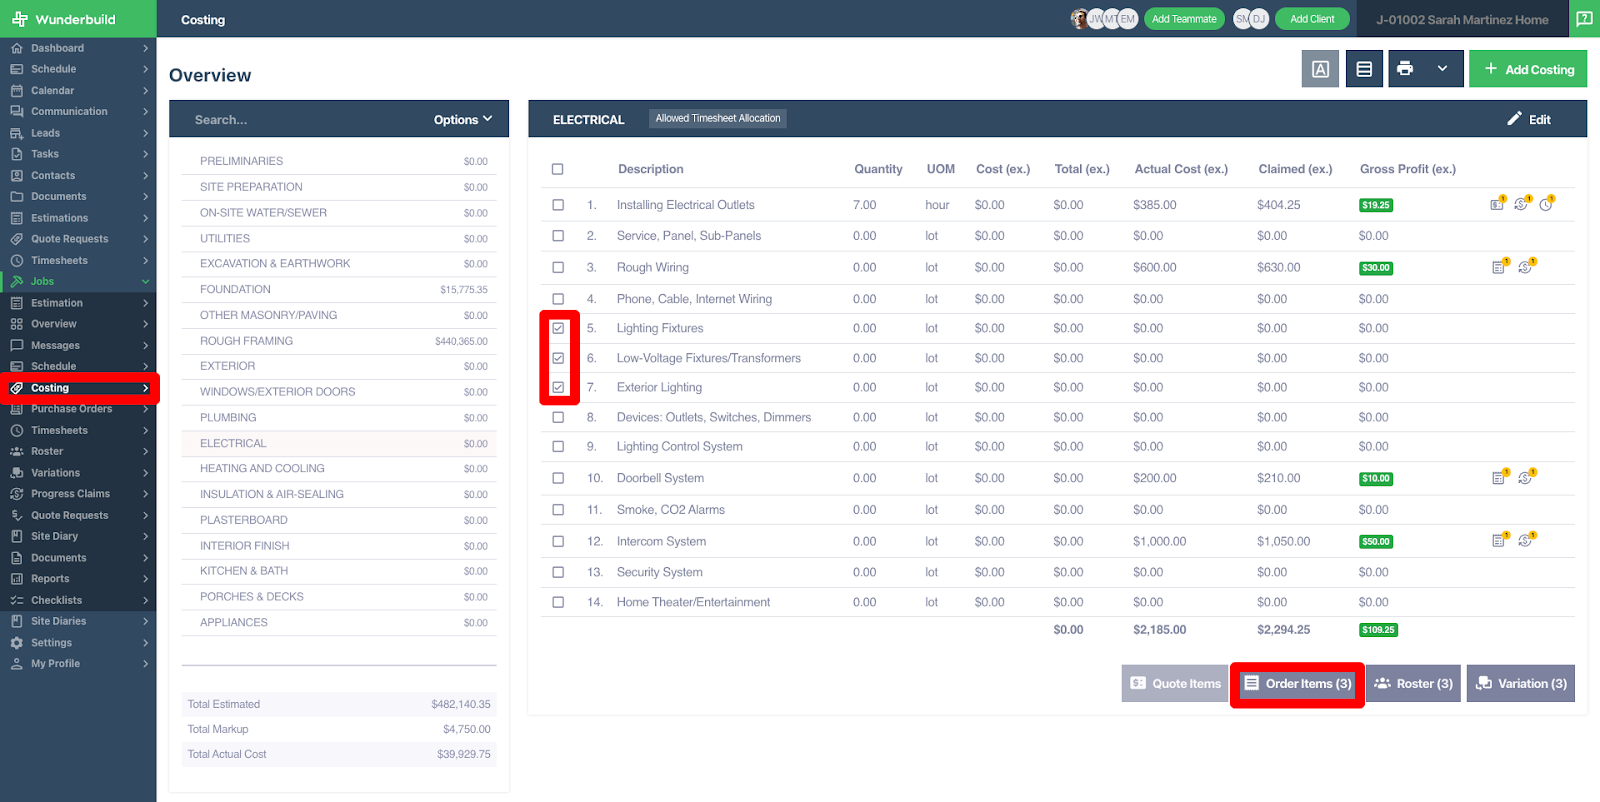
Go to the Job list and select your Job > go to the Costings tab > tick items from any of your costing categories you want to order > select ‘Order items’ button.
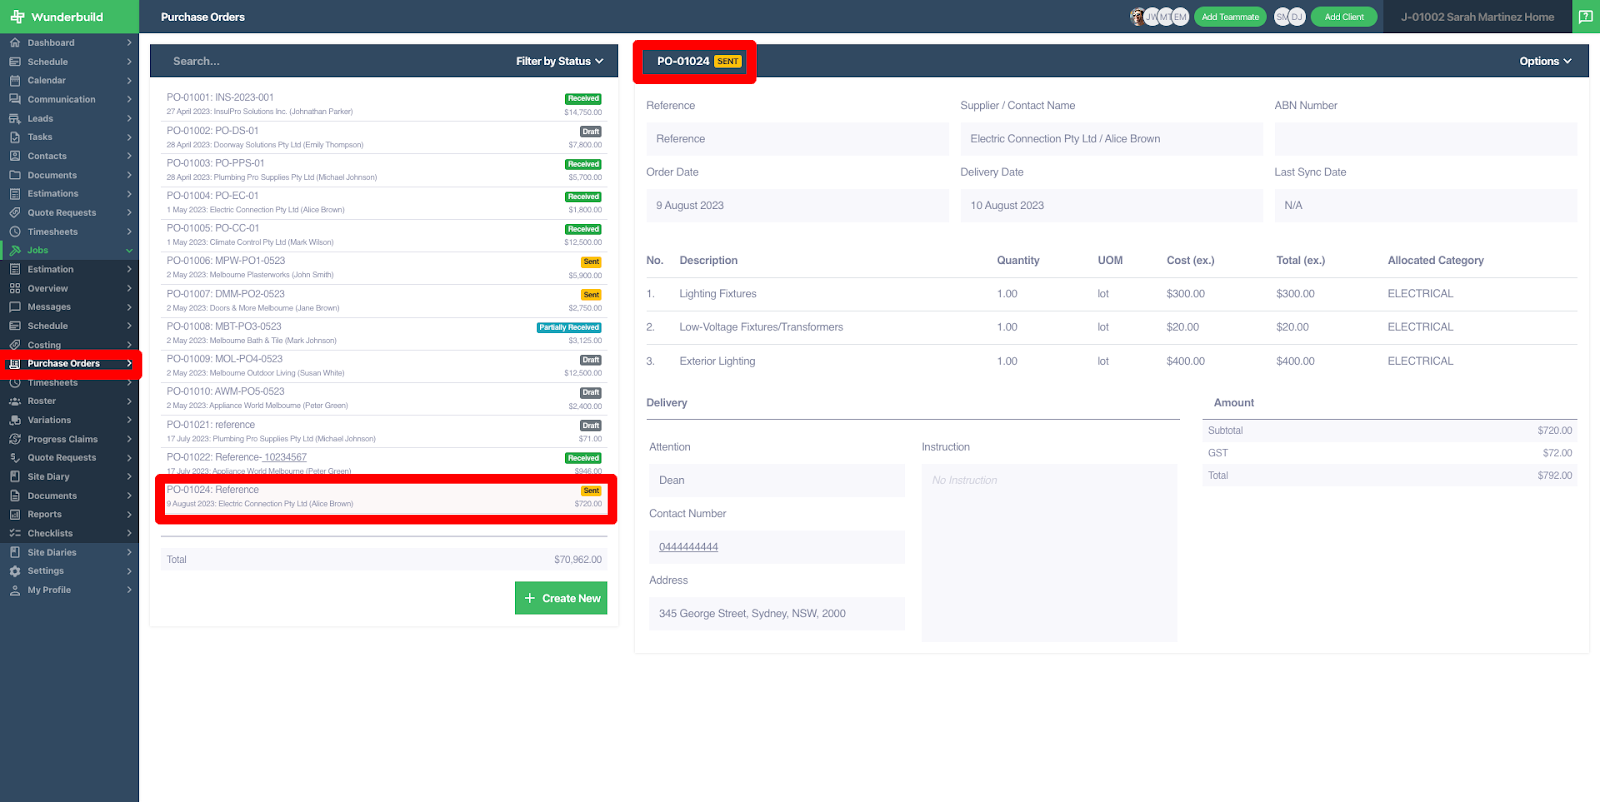
Now you must fill in the details of your purchase order and add your reference, once done click ‘Create’.

There will be a popup option allowing you to optionally send the purchase order to your suppliers an email through Wunderbuild with the order attached as a PDF.
Fill your email details out and ‘Send’. Otherwise you can go straight to the purchase order tab.


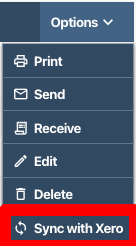
Manually Trigger Xero Sync
To speed this up you can do a immediate sync by going to options > ‘Sync with Xero’. After a few moments, you will see the Purchase Order appear in your Xero account.
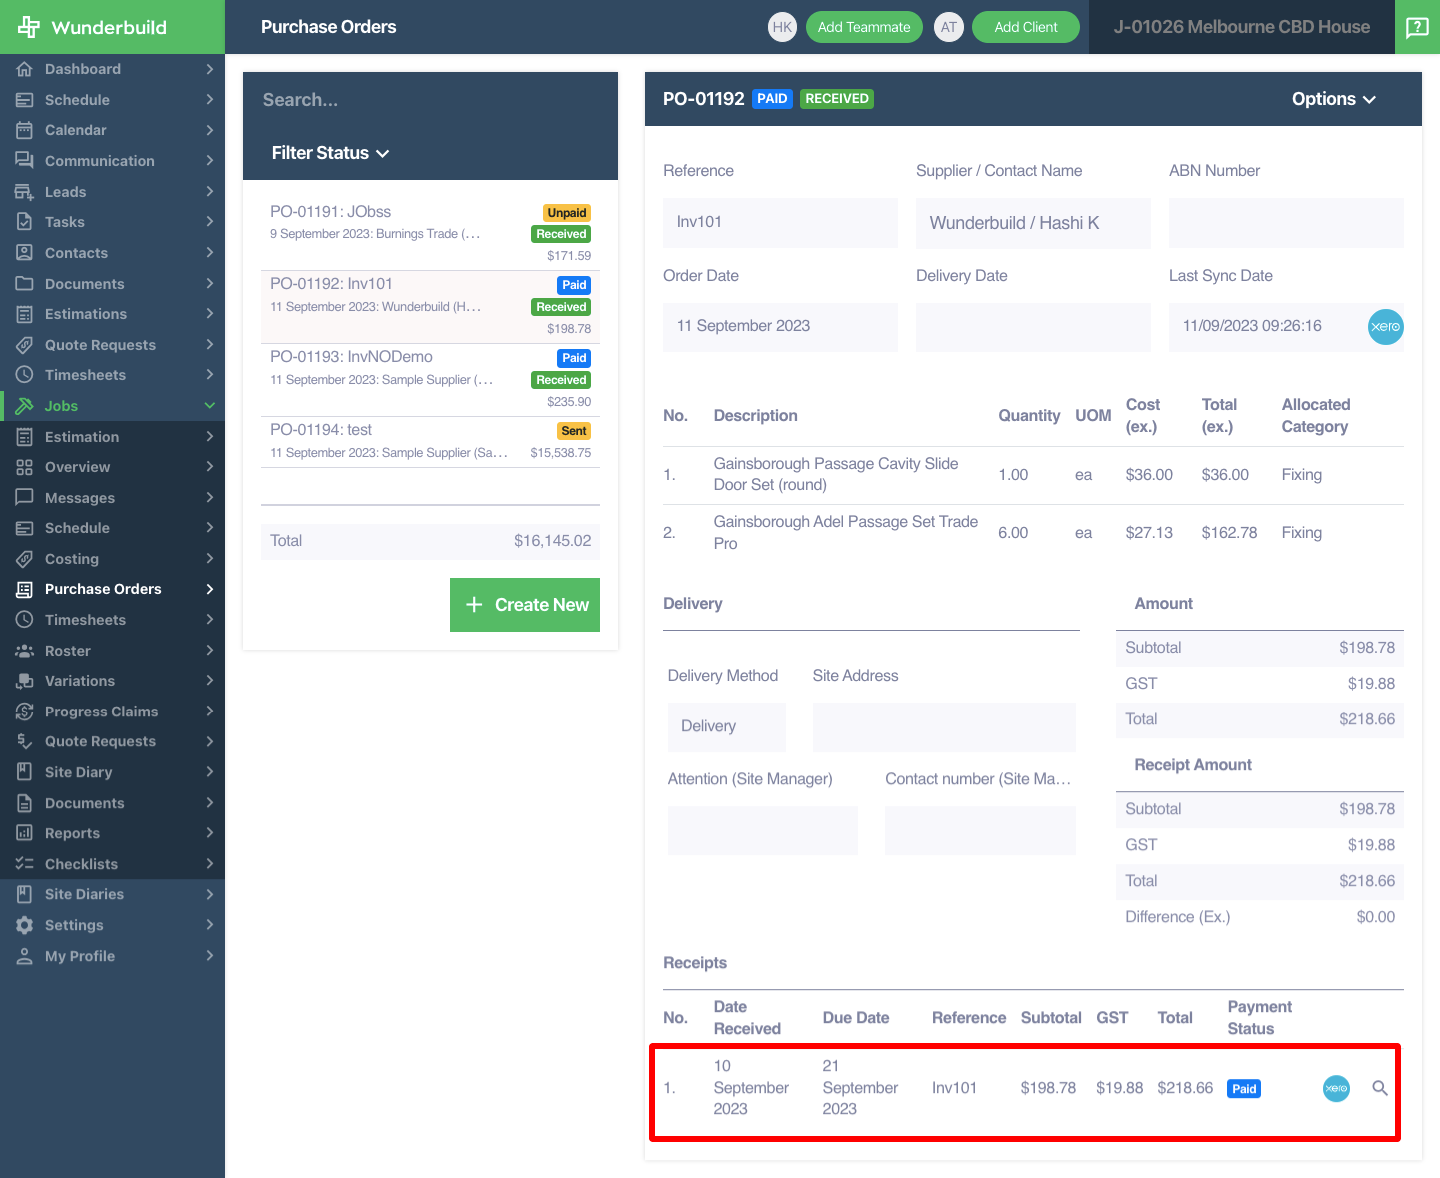
Add receipts/invoices from Suppliers
Go to the purchase order you created > select 'Options' > Receive > then fill out details including reference, date order was received and its receive status > attach a receipt from your supplier if you have one > click ‘Receive’.

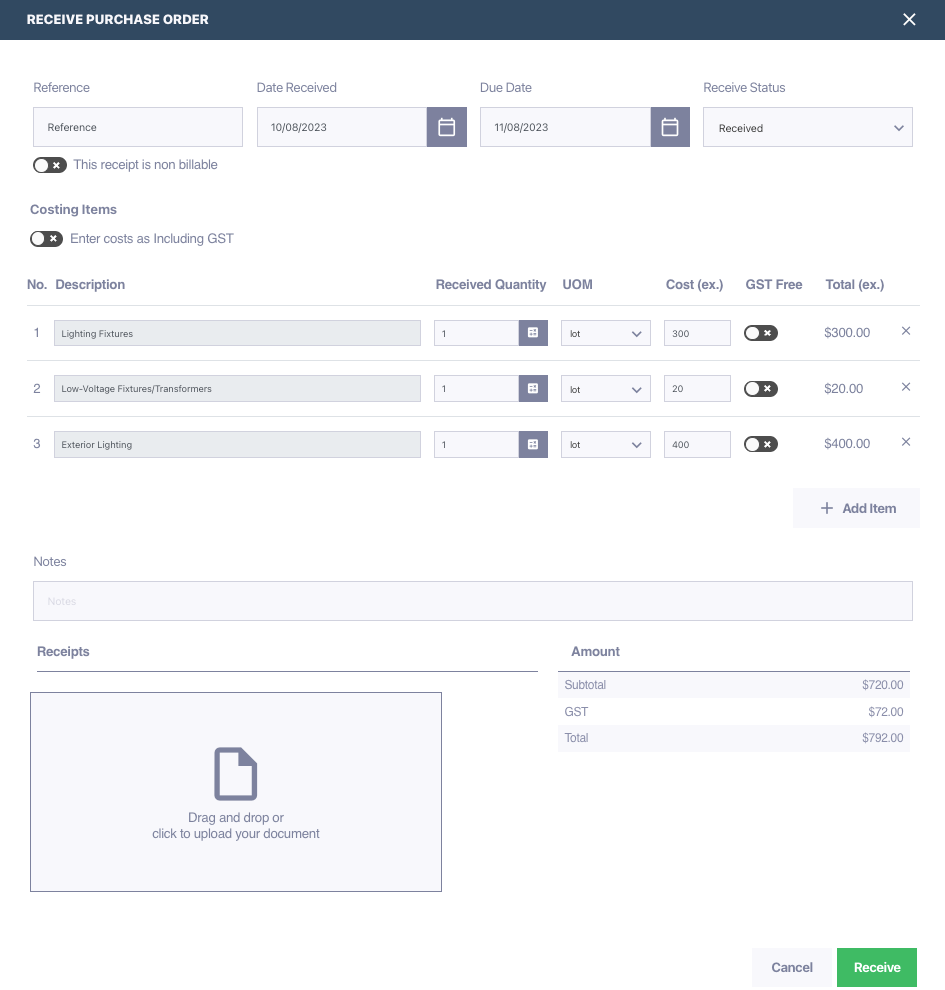
Wunderbuild will sync this receipt amount as a Bill To Pay in Xero.
Once synced, if you go to Xero and check your ‘Bills to Pay’, you will see your purchase order receipt there and you can reference your purchase order number in Wunderbuild to find it in Xero.
Click into it and you will also see any attachments that were added.
If you partially received the order in Wunderbuild and have now received the order, you can go back and repeat the above steps making sure you mark your purchase order as received.
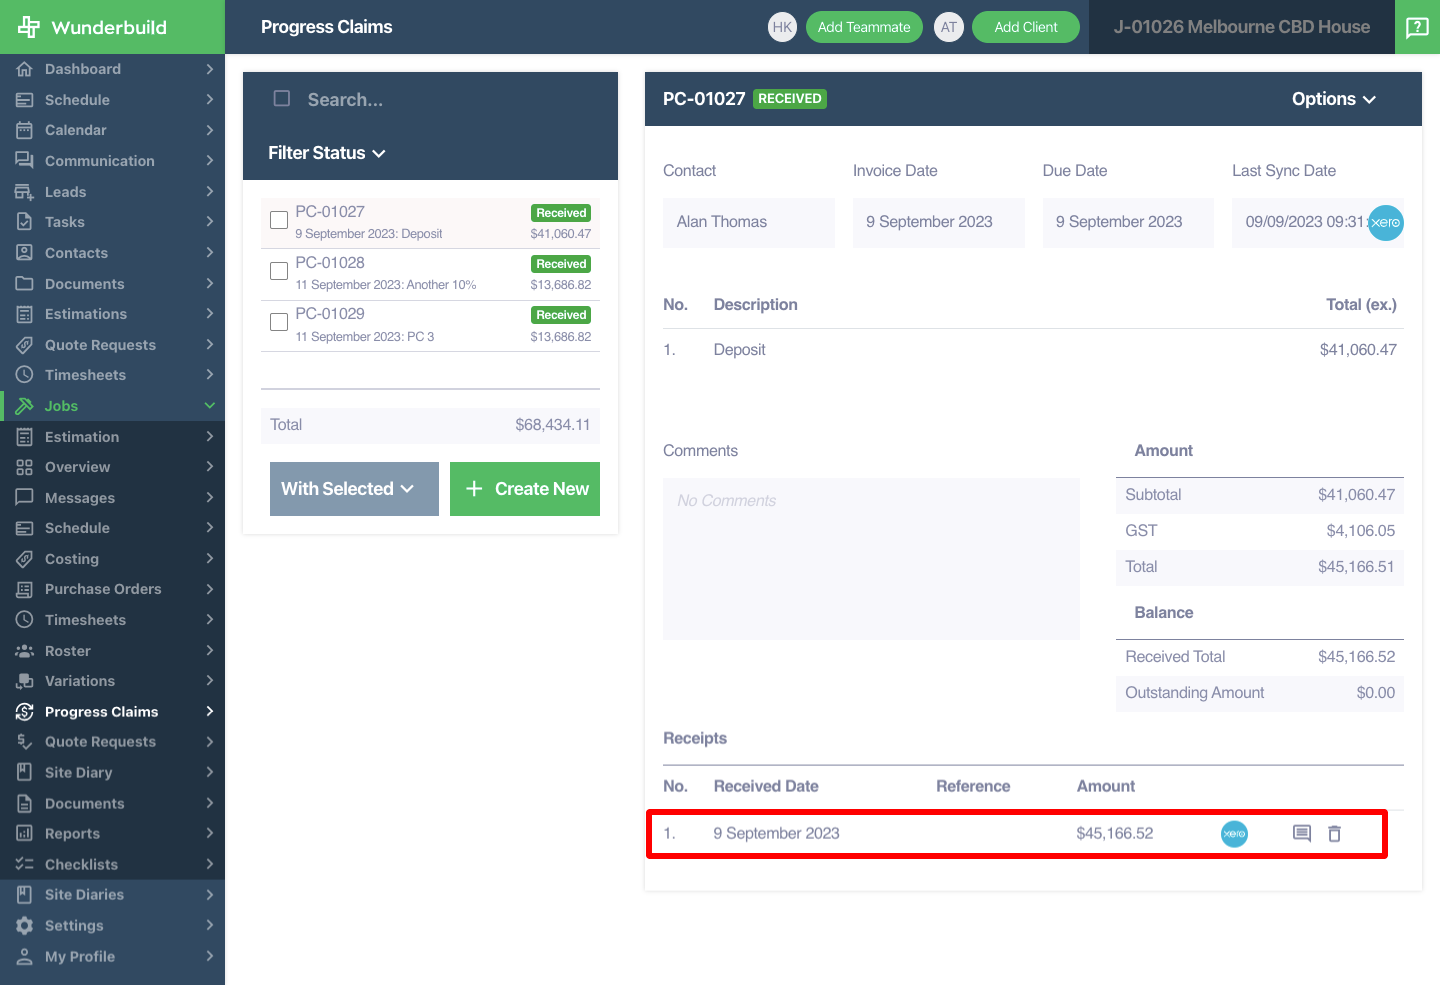
Sync Progress claims to Xero as invoices
Go to the Progress claim tab in your job > click ‘Create New’ and create a progress claim to claim part of your work done.
Once you have created a progress claim, go to options > Click 'Receive'.
It will then sync to Xero automatically. To speed this up, select 'Options' > Click ‘Sync with Xero’.
Once synced you can view your progress claim as an Invoice in Xero.
Data flow between Wunderbuild and Xero


Related Articles
Settings User Guide
1. Accessing the Billing Tab: Navigate to the Billing tab by clicking on Billing in the Settings subtab. Subscription Category: You may change your subscription type in Wunderbuild by going to this area. Invoices: You will receive your Wunderbuild ...How to upload bills from Xero to Wunderbuild?
1. Enable Two-way sync in Settings > Integrations > Configure. 2. On your Job Overview Page. Under Details, click on the edit button to add your Xero tracking name. The name shall appear in Xero in the WB Job dropdown button. 3. In Xero, make sure to ...Job Management User Guide
Managing All Existing Jobs 1. Accessing the Jobs Management Tab: Navigate to the Jobs Management tab on the main menu to view the visual board of all the jobs. 2. Accessing and modifying a Job: Click the job title to access that specific job. Click ...Wunderbuild Job Schedule 2.0 User Guide
Importing The following is a guide on the updated Wunderbuild job schedule. To begin go to your jobs then schedule section inside your job. 1. Click ‘options’ on your schedule to import your schedule into Wunderbuild. Below are instructions on the ...Tasks User Guide
1. Accessing the Tasks: Navigate the Tasks section within the main menu to gain an overview of all tasks across your various job assignments. 2. Search/Filtering the Tasks: a) Search a task by using the search bar on the top right corner of the ...